Showing posts with label R12. Show all posts

Wednesday, March 02, 2011

Solved: Logged in user does not have permission to access this page.

When you work with a new installation of the Oracle Install Base module you may encounter some issues when you try to enter a note. This is also encountered in some of the setup done for the vision installation of Oracle e-Business Suite Release 12. I encountered it during some tests of a R12 vision installation. The issue is that if you click "create" button in the notes page in Oracle Install Base you will get a error page stating "Logged in user does not have permission to access this page". No other explanation is given. Looking at metalink the following cause is given in note 455871.1 "The function JTF_CAL_FUNCTION_SECURITY is not added to Oracle Install Base Menu as a SubMenu.". This note is giving you a solution for release 11.5.10.2 and some hints for release 12.

As it turns out the note is not spot on for release 12. What you need to do to get it working for release 12 is the following:

Step 1:
- login to the system and select the system Administrator responsibility
- Go to "security" -> "responsibilities" -> "Define"
- query the Install Base responsibility which is giving you the issue
- copy the value of the "menu" field

Step 2:
- Within the system administrator responsibility go to "applications" and then "Menu".
- Query the correct menu by searching the "User Menu Name" which you retrieved from step1

Step 3:
Now you have to create a new submenu under the menu.
- Leave the "prompt" value blank
- Enter the value "JTF HTML Calendar-Tasks-Notes Function security menu" in the submenu field.
- Enter the value "JTF HTML Calendar Function Security" in the function field
- Save the new submenu

Step 4:
bounce the Apache server so the webserver cache is cleared.

Now you should be able to login to Oracle e-Business Suite and all should work. The change with the metalink note is the value that needs to be entered in the function field when creating a new submenu. The value stated in the metaling note will throw a error when done in a release 12 instance.

Saturday, September 25, 2010

Oracle Promotional goods

When you run your sales in Oracle E-Business suite you want from time to time run promotions. For example if you sell an item in Oracle Order Management you want to “give” the customer a second item for free, a promotional item.

This is common practice in a lot of businesses and especially in B2C businesses that you get a second item for free if you buy a special product. Oracle is providing you will all the options needed to arrange this inside Oracle e-Business Suite.

For example, if you sell a laptop you want to add an extra battery pack as a promotional item. You can arrange this by using Oracle Advanced Pricing and create a Modifier of the type “Promotion”. As can be seen below we create a modifier named JLO-01.

Inside the modifier we have created a line for item AS18947. This is a laptop and we want to give a promotion of a second item for every customer who buys this item. If you click the “Define Details” button you will be able to set the item that the customer will “get”. You have to make sure you define it as a “get”item.

You can see that we have stated here a get item for item CM11222 and we have stated the “Application Methode” is “New Price”. This will make sure that the price of the get item will be overwritten by the value defined in the “value” field which is in this case zero. Meaning this item will be for free if the customer buys your item AS18947.

If we now add the item to an order we will see something nice happening. We use Oracle Order Management to create a new order. If we add the line and we are done you will notice a message popping up stating that a second line is created.

You can see in the below example that indeed a new line has been added for item CM11222 for the quantity 1 and the price 0. This is what we intended when we created the modifier JLO-01. If you check via actions > “View Adjustments” you will also notice that a adjustment to the order is done by modifier JLO-01


Wednesday, April 21, 2010

Oracle flexfields as LOV

The issue with most systems where users have the option to enter data in a free form is that as soon as they enter the information you have the possibility that they make a typo. For a textfield like a description this is from a system point of view not a very big issue, however if you want to base logic on the information entered it can be a very big problem. To prevent this you should design applications and interfaces always in such a way that a user can make as little as possible mistakes. You can for example use dropdown menus where a user can select values instead of entering them by hand. This will reduce the number of possible mistakes.

In Oracle E-Business suite you have besides the standard fields where users can enter information also a option to add extra fields (on most of the screens, not all). Those fields are referred to as flexfields. You have the option to define a Oracle flexfield as a free text field however you can also make it a dropdown menu or LOV (List Of Values).

Most Oracle consultants are aware of how to create a free text field to be used as a flexfield. The option of creating a flexfield as a LOV is however somewhat less commonly know. Please find below an example of how to create a DFF (Dynamic FlexField) with a LOV (List Of Values). We used in this example a request to add a LOV as a Flexfield to a order line in order management.

Step 1:
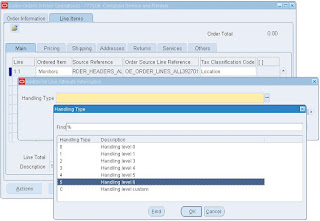
Identify where you want to create a flexfield. In our case this is in Oracle Order Management at order line level. Just query any random order in the screen and get the record history information of the line via “Help” > “Record History”. You will get a screen like the one below:


Here you will see that the table name is OE_ORDER_LINES_V. This is however not correct, the _V is indicating that this is not a table, it is a view. And as flexfield information can only be stored in a table we have to find out which table is used. In 99 percent of the cases you can remove the _V and you have your table name or in some cases search for something else than the V In our example the table is OE_ORDER_LINES_ALL.

Step 2:
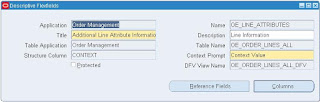
Select the responsibility “Application Developer” and navigate to “Flexfield” > “Descriptive” > “Register”. Here we will query the descriptive flexfield which is already defined for this table. We can do so by executing a query against the table name which we just learned is OE_ORDER_LINES_ALL.


From this screen you can see that the application is indeed “Order Management” and that the title is “Additional Line Attribute Information”. We note this down as we need it in a following step.
Step 3:
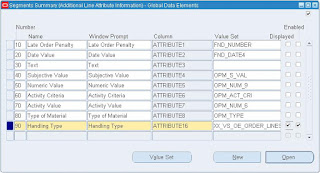
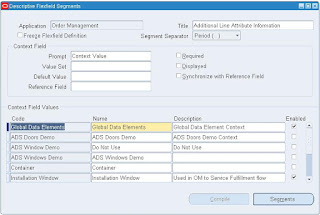
Select the responsibility “Application Developer” and navigate to “Flexfield” > “Descriptive” > “Segments”. Here you can query the needed segment (or create one). In our case we search for Application = “Order Management” and Title = “Additional Line Attribute Information”.


Select a Context Field Value you want your new flexfield to appear in (in our case we use Global Data Elemenst) and click the “Segments”button.

Step 4:
Here you can enter a new line (in our case line 90) with the information you need.

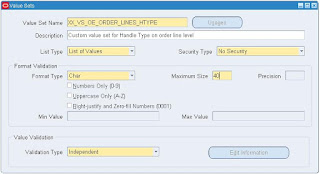
However, before you enter information in the “value set” field click on the “value Set” button. This will open a screen where you can enter the information about the value set that later will hold your preset data for your LOV which will appear in your flexfield.
It is smart to pick a name starting with XX_VS where XX stands for custom setup and the VS is representing that it is a value set. After you have set all the information you want you can save it and return to the previous screen where you can enter the new “value set name” into the “value set” field. Save you work and close the screen.

Step 5:
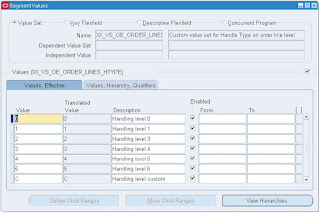
Select the responsibility “Application Developer” and navigate to “Flexfield” > “Descriptive” > “Values”. Query for your new Value Set.

Here you can enter the preset information as you whish. After you are done, save your work.

Step 6:
Go to the screen where you intended your flexfield to be a check it. If all is ok you should now have your flexfield as a List Of values in your screen.

Tuesday, April 06, 2010

Not a valid responsibility for the current user

Some behavior I noticed in Oracle EBS release 11 (11.5.10.2) turns out to be still in Oracle release 12. When you add yourself a responsibility which makes use of JSP pages it might happen that if you try to enter one of those screens you get a error message something like:

“iStore and Sales Management is not a valid responsibility for the current user. Please contact your System Administrator. “

Here can substitute “iStore and Sales Management” with whatever responsibility you have added and makes use of JSP pages. It also turns out that from the JSP page menu you are unable to see the newly added responsibility.

The issue is that the webserver cache is still thinking you do not have been granted this responsibility and because of this it is throwing you this error page. A solution is to flush the cache. You can flush the cache by (A)rebooting the apache webserver, (B)deleting the cache object by hand or (C) using the Oracle EBS Applications Administration pages.

The Applications Administration responsibility is providing you the option to flush the cache manually without having to reboot the apache webserver or diving into the cache objects. A downside of this is that those pages are also not form object but JSP pages so if you do not have this responsibility already you will not be able to use it.

Go to Application Administration and the “Core Services” tab, select the sub-tab “Caching Framework” and on this page select “Global Configuration”. On this page you will find a button “Clear All Cache” You will receive a warning like this:

“Clicking on 'Yes' will clear all the caches across all the mid-tiers. This will impact performance. Are you sure you want to proceed? “

This is not a false warning, as all java objects will have to be JIT compiled again and placed in the cache your applications will be slower until they are used at least once. So you might want to time the moment you do this. However, after clicking the button the cache will be flushed and you will have the ability to access the responsibility without any issue.


Thursday, May 14, 2009

Oracle R12, Min-max planning report

As discussed in the previous post I discussed a little the min max planning of a item per subinventory in Oracle e-Business suite Release 12. You can set for a item the minimum and maximum stock level. Fast running items will have a bigger stock in most cases than items that you sell every now and then. Setting the correct minimum and maximum stock levels for a item can be a very challenging task. For large organizations it can involve datamining and some higher math, however I will not go into this in this post.

To make use of the minimum and maximum stock level settings defined for a subinventory within Oracle Inventory you can make use of the Min-max planning report. To start this report, or schedule it you have to go to you concurrent requests screen and start a new single request. The name of the concurrent request is "Min-max planning report". There are numerous parameters which can be set for this concurrent request.

Planning Level:
planning level states if you want to run the report on organization level which will include all the subinventories of the organization or on a specific subinventory. If you pick the last you will have to define the subinventory.

Item selection:
Here you can state the selection of the items you want to include in the report. You can pick all the items that have a current stock level below the minimum stock level, include only the items which have currently more stock than the max stock level or include all items.

Category set:
You have to set a category set, by default it will be set for inventory item however a other item category for the items to be included on the min-max planning report can be chosen.

Item Category:
Item category families and categories can be set to even more finely grain the selection of items you can set to be included in the final report.

Items from (to):
A range of items can be set if you want a defined set of items. You can use this option to run the report only for a single item. In this case you define the same item number in the from and to field.

Planners:
The same as can be done for items in the item from and item to fields can be done for the planners. You can run the report for a specific planner of group of planners.

Buyers:
the same as can be done for items and planners can be done for buyers. You can run the report for a specific buyer or set of buyers. This can be very useful when you (as a buyer) want to run the report for the items you are responsible for.

Sort By:
Sort by will influence the order of the items on the report. It can be set to Item, Category, Buyer or Planner.

Demand cutoff date:
The report includes demand on or before this date. If you do not check Net Demand this calculation is for display purposes only. You can also set the offset for this date.

Supply cutoff date:
The calculation for the includes open supply orders on or before this date.

Restock:
Here you can state if you want to do a restock automatically based upon the outcome of the report. When you set it to yes the system will create requisitions. If you run the report on organization level it will also run make jobs for the items where you have stated it is a make item.

For Repetitive Items:
"If you are using the Organization Planning Level, choose one of the following For Repetitive Item options: Create Requisitions for items under minimum quantity, Create Discrete Jobs for items under minimum quantity or run the Report Only without creating jobs or requisitions"

Default Delivery To:
Default Delivery To enables you to set a default deliver to location. This is only used when you use the restock = yes option.

Net Unreserved Orders, Reserved Orders, WIP Demand:
If set to yes the reserved, unreserved orders and the WIP demand will be subtracted from the total available stock on the given date so you will get a good indication what the stock will be on this given date and what the demand for restock will be on this date.

Include PO Supply, Move Order Supply, WIP supply, Interface:
If set to yes the calculation will take in account the quantity which will be delivered for this date based upon purchase orders, move orders, WIP jobs and non-nettable subinventories.

Lot Control:
here you will be able to state if items which are under lot control should be included in the report.

Display Format:
Here you will be able to set the way the report is displayed and what it will contain.

Display Item Description:
Include the item description in the report or not.


Saturday, May 02, 2009

Oracle R12 eBS Item Types setup

When defining items in Oracle E-Business Suite Release 12 (R12) and working on the setup of Oracle Inventory one of the things that you will have to look into is the Item Types. A item always needs to have a item type to identify what kind of item it is. By default Oracle will provide you a list of preset items which are already defined and which are used throughout the system. In basic the item types which are default in Oracle are usable and well thought about. The predefined Item Types are: ATO model, Finished good, Freight, Inventory Type, Kit, Model, Option Class, Outside processing item, PTO model, Phantom item,Planning, Product Family, Purchased item, Reference item, Subassembly and Supply item.

Even do those Item Types will cover for most of the items used in a general company it can be beneficial to setup your own Item Types. For example you might already have types defined for items which are commonly used in the company and the legacy systems of the company. For the adoption of a new system it can be good not to change this into new types or you might even have some dependencies on the Item Types towards other systems which makes that you have to define your own Item Types.

A Item Type for a Item is set when setting up the item in the Item Master, creating your own Item Types is done under a oracle Inventory responsibility where you are able to do setup. To create a new Item Type navigate to "Setup", "Items" and select "Item Types". Here you will be presented with a screen as shown below.

In the screenshot above you can see the definition of the Item Type Lookups. You can see that the lookups are defined for the application "Inventory" with the description "Item Types". Also you can see that by default the Item Types access level is set to User which indicates that users can add and change the lookups. That is, if they have access to the functionality via their responsibility.

What can and needs to be defined when creating a new Item Type;

Code: This is the unique identifier of the Item Type.

Meaning
: A free text field used to define the meaning of the Item Type.

Description
: A free text field used for providing a "human" description/identifier.

Tag
: tags can be used for the ease of maintenance, you can use it to group Item Types so you easily query and lookup groups of Item Types.

Effective Dates
: the from and to effective dates are used to define a time range when a Item Type becomes available for use and possible a date after which it no longer can be used. However it it not necessary to define this. If you do not provide a start date the Item Type will become affective immediately.

Enabled
: A checkbox where you can quickly activate or deactivate a Item Type when needed without making use of the effective dates.

Thursday, April 30, 2009

Oracle R12 eBS Item Catalog Groups

When we are thinking about setting up a new Oracle E-Business Suite Release 12 instance (or any other version) you will have to spend some time about thinking how you will arrange items. I have already pointed out some things in previous posts on why this can be very handy in a later stage when you are in production and people are using Oracle E-Business Suite in a day to day working situation.

A good starting point is when you start thinking about which items are alike, this comes in handy when you start thinking about Item Templates which can come in handy when you create new items. One other thing you can think about at that point is Item Catalog Groups. With Item Catalog Groups in Oracle you can catalog your items in groups and add extra information to your items based upon the category the items is related to.

Creating catalog groups and placing items in catalog groups will have several benefits. One of them obviously is that you will be able to group items and search within groups. Other benefits are that you will be able, for example, add more information which is relevant only for the items within this group and you will be able to automatically create aÆ’ item description based upon this. So this will also help you bring uniformity in the way you create your item descriptions.

To be able to do so you first will have to create a Catalog Item group within Oracle Inventory. To do so navigate to "Setup", "Items", "Catalog Groups". Here you will be able to view, edit and create new catalog groups.
As shown in the above screenshot I created a new Catalog Group in Oracle Inventory named "Gear Pumps" which will hold all the items which are gear pumps. Or in other words, in alter stage I will assign the Catalog Group "Gear Pumps" to all the existing items who are gear pumps. If you create a new group, save it and click on the Details button you will be able to set more options.
As you can see in the above screenshot I have set some details for this Item Catalog Group. I have been adding Descriptive Elements. Descriptive Elements are used per Item. In this case I have chosen 4 Descriptive Elements which can be set for all the items which will be placed this Item Catalog Group. The sequence is deliberately defined as 10, 20, 30, 40 because in this case I can easily add a record in the middle without having to change all the sequences of the existing records. This is in general a good idea to do. I also have set for all 4 of the Descriptive Elements that they are required so when a item is added to the group you have to set it. Only for 3 of the 4 I have set that it is a Description Default. When you set a Descriptive Element to Description Default it will be by default used to generate you description.

When you like to add a item to a Item Catalog group you go to the Item Master and query the item, then go to the Tools menu and select Catalog. you will be presented with a screen similar as in the screenshot below.
In this case I have selected the Item Catalog Group I created " gear Pumps" in the top "Catalog Group" field. When you select it you will be presented with a list of all the available and active Item Catalog Groups. After filling all the requierd fields for the Descriptive Elements, in this case all, you can use the Update Description button which will fill the item description with the generated "Item Catalog Description" based upon the catalog name and the descriptive elements in combination with their sequence. This is how you can generate standardized item descriptions. You do however have the possibility to change and edit the description so you will ne bound to the generated description. If you set this up smartly however it can be very beneficial.

Monday, April 27, 2009

Oracle R12 eBS Item Templates

When creating items in Oracle E-Business Suite R12 there are a lot of options you can set for a item. Numerous of attributes can be set for a item and also numerous of items can be set incorrect for a item which can result in problems later in the process.

because you are able to control so much attributes from a item Oracle has some controls in place, for example some attributes of a item can only be controlled at "Item Master" level and some can be controlled at organization level. This makes is so that some people, the people maintaing all the items, can control some parts of the item and some can be controlled by the organization who is using the item. When a item attribute is controlled on item master level the settings are applied for all organizations. When a attribute is controlled at organization level this attribute is only set for the current organization so you can have some localization on your item settings. This can come in handy when you for example would like to provide the option to change the way it is stocked or the min/max planning settings.

however, even do we have this security in place we still have a issue on the moment that a item is entered. As in many cases the initial creation of a item is still done by humans we do have a weak link. Humans are making mistakes and when setting up a item you can make lots and lots of mistakes. When you start thinking about your items you will be able to create a couple of standard groups in which most settings are the same, for example, purchase items, service items, digital items, internal items, etc etc etc. all having their own basic setup. Because of this Oracle created Item Templates. You can create Item templates and use them every time you create a new item to make the number of human error's decrease.

As shown above I am trying to create a new item in Oracle Inventory by using a item template. you can do this by simply start creating a new Item and before you do anything click "tools" from the menu bar and select "Copy From" from the dropdown menu. When you select this you will be able to pick the Item template you would like to use.

You can setup your item templates in Oracle Inventory and navigate to "Setup", "Items", "Templates". Here you will have the ability to search for existing templates or create a new template when needed.

When you start with the setup of your instance and blueprinting you will notice that creating the blueprint for your Item Templates will take some time. However, when it is in place you will know for sure that the people who have to create and maintain the items will be so happy with this option and it will save them so much time, effort and money that it will make up for the initial time you have to spend on it.

When you look at the screen where you can create a new Item Template you will notice that you can select the values of every tab which is shown in the Item screen so for the easy of setup this can really help you. You can also see that it states where a attribute is controlled, on master level or on organization level which we have been discussing a couple of posts ago. Also you can set it enabled or disabled and you can set the default value. When you set a default value a user can set a other value so it is only a guideline in the template and it is not fixed. However this guideline will improve the productivity of users because they do not have to set all the attributes for a item but they can simply apply a template to a new item.


Wednesday, April 22, 2009

Oracle R12 global instance with RAC

LG Electronics is currently working on building a large scale global Oracle E-Business Suite Release 12 implementation wich should be ready in 2010. In combination with Oracle SOA Suite and Oracle WebLogic Portals the single instance will be capable of servicing complete LG Electronics. To make sure the systems will be up and running all the time LG is making use of a 4 node real application cluster which will be running the Oracle E-Business suite R12 instance. To be complete secure the entire storage, networking and all the servers are multiplexed to ensure the best uptime possible.

Even do the complete rollout is not yet completed large parts of LG Electronics are already making use of the R12 instance. Oracle has created a customer video which can be seen below. If you look into the customer successes PDF which is provided at the Oracle website you can see the massive amount of applications and options LG is using in their new R12 instance; Financials, Assets, Cash Management, Financial Analyzer, Supply Chain Management, Order Management, Purchasing, Advanced Pricing, Release Management, Manufacturing, Inventory Management, Human Resources, Payroll, Self-Service HR, Time & Labor, Learning Management, Real Application Clusters and SOA Suite.


Sunday, April 19, 2009

Oracle R12 Item attribute controls

When you setup Oracle E-Business suite and when you are thinking about items and items setup you might want to consider item attribute controls. If you have a company with more than one location which are defined as organizations in your Oracle E-Business instance you might not want to give all organizations the power to control all the attributes which can be set for a item.

In general the way that Oracle is handling items is that the items are created in a item master organization and after they are created they are assigned to the organizations who will do transactions with those items. If you have for example a master organization and organizations per country It is a good idea to give the country organizations the option to change the description of the item because they most likely will like to have the description in their own language. On the other hand the physical attributes like weight and dimensions will stay the same. To ensure that those settings are not lost you would like to control that on organization level they can change some things and other can not be changed.

To ensure this you can setup Item attribute controls. In the below screenshot you can see the screen where this is done in Oracle e-Business Suite Release 12 (oracle ebs R12).

Here you can set per tab/field for every item where it is controlled, on master level or on organization level. This can be controlled via the Inventory responsibility, go to Setup – Items – Attribute Controls. Here you will be presented with a screen similar as the screen below. This will allow you to set every item attribute to be controlled on master level or on organization level. Specialy for large companies who have a item information department this can be very handy. Also complicacy rules can ask for such security to be in place.


Wednesday, April 15, 2009

Oracle EBS R12 Supply Chain


Oracle just released some new certifications for Oracle E-Business Suite Release 12. For Oracle EBS R12 you now can start a certification for E-Business Suite R12 Supply Chain Certified Expert Consultant, Purchasing and for E-Business Suite R12 Supply Chain Certified Expert Consultant, Order Management.

The Oracle E-Business Suite Supply Chain Management family of applications integrates and automates all key supply chain activities, from design, planning and procurement to manufacturing and fulfillment. IT professionals need special skills to implement and manage critical supply chain related business processes. The Oracle r12 E-Business Suite Supply Chain Expert credential was created to help IT professionals gain recognition for skills obtained through training and experience. Those who become certified have a proven foundation necessary to help keep implementations on time and on budget.

Among topics that candidates must master are key components of Oracle Inventory Management including materials transfer, receipt to issue process, inventory organizations and inventory controls. Additionally candidates may specialize in either Oracle Order Management or Oracle Purchasing by choosing one of two required elective exams. Candidates who wish to pursue both paths may take both electives and upon successful completion will receive two separate credentials.


You will have to do certification exam (1Z0-225) or certification exam (1Z0-226). In all cases you also will have to pass Essentials exam (1Z0-204) which will be about Oracle E-Business Suite R12: E-Business Essentials . About this exame you can find the details at the
Oracle website along with all the other information about the certification