Monday, September 29, 2008

Oracle Calendar on Ubuntu

Installing Oracle Calendar client on a Ubuntu Linux will not work out of the box. Oracle has launched a new version of the client software and also released a version for Linux. For some reason a lot of Oracle products will not work out of the box on your Ubuntu and/or Debian Linux installation. To make it work on Ubunutu you have to make some changes. When you download the client and run the installer you will be presented with the following errors:


Preparing to install...
Extracting the JRE from the installer archive...
Unpacking the JRE...
Extracting the installation resources from the installer archive...
Configuring the installer for this system's environment...
nawk: error while loading shared libraries: libm.so.6: cannot open shared object file: No such file or directory
dirname: error while loading shared libraries: libc.so.6: cannot open shared object file: No such file or directory
/bin/ls: error while loading shared libraries: librt.so.1: cannot open shared object file: No such file or directory
basename: error while loading shared libraries: libc.so.6: cannot open shared object file: No such file or directory
dirname: error while loading shared libraries: libc.so.6: cannot open shared object file: No such file or directory
basename: error while loading shared libraries: libc.so.6: cannot open shared object file: No such file or directory
hostname: error while loading shared libraries: libc.so.6: cannot open shared object file: No such file or directory

Launching installer...

grep: error while loading shared libraries: libc.so.6: cannot open shared object file: No such file or directory
/tmp/install.dir.19586/Linux/resource/jre/bin/java: error while loading shared libraries: libpthread.so.0: cannot open shared object file: No such file or directory


The root cause of those errors is that the client makes use of a LD_ASSUME_KERNEL call. to get around this problem you have to edit your installation file. David Mayo from the University of Bath suggested the following steps to make it work. I tested it and it is working:

cp cal_linux cal_linux.bak

cat cal_linux.bak | sed "s/export LD_ASSUME_KERNEL/#xport LD_ASSUME_KERNEL/" > cal_linux

Now the installation should work as expected, Do make sure that if you add a new connection in the GUI that you enter the port number after the server name. If you do not do this you will not be presented with a error message and the setup of a new connection will fail. It took me some time to find out that it was not a error in the GUI but simple a fact of not presenting a error message when you do not give the port number in this field. Just a tip that could save you a lot of time.

Fastest Database machine

The Oracle Exadata server is claimed to be the fastest hardware capable of running Oracle databases. The machine is developerd by HP and Oracle and is specially tuned to run Oracle databases. Oracle states the following: "Exadata delivers outstanding I/O and SQL processing performance for data warehousing applications by leveraging a massively parallel architecture to enable a dynamic storage grid for Oracle Database 11g deployments."

According to Oracle the main problem with current architectures is that they are unaware of the fact that they are housing a database. When having, for example a hundred terabyte plus, database this will reside on a large amount of disks which are coupled to your server(s) via Host Bus Adapters to your storage area network. The way traditional HBA's are handling the IO load is not optimal for a very large datasets. The Exadata server makes use of a massively parallel architecture to enable more pipes, also the pipes are made wider to transport more data. Also the storage part is SQL aware and will only 'ship' the data needed by the requesting SQL statement. Those improvements will provide a architecture in which you pipes are not filled with data you do not need and the system van make use of more and wider pipes to the server so you will lose the bottlenecks of I/O in your architecture.

The Exadata server makes use of InfiniBand interconnect to connect the storage to the server. You can check the InfinBand speeds on this wiki page. InfiniBand is a switched fabric communications link primarily used in high-performance computing. Its features include quality of service and failover, and it is designed to be scalable. The InfiniBand architecture specification defines a connection between processor nodes and high performance I/O nodes such as storage devices. It is a superset of the Virtual Interface Architecture.

Oracle and HP have chosen to make the ExaData solution robust by making use of disk mirroring provided via Automatic Storage Management (ASM), and hot swappable Exadata disks, ensure the database can tolerate the failure of individual disk drives. Data is mirrored across cells to ensure that the failure of a cell will not cause loss of data, or inhibit data accessibility. This massively parallel architecture delivers unbounded scalability and high availability.

The SQL processing optimization is done by function shipping of SQL statements. A statement is offloaded from the database server tier and shipped to the storage tier. By doing this the CPU time is not used on the database server, the statement is executed on the storage tier and only the result is shipped back to the database server. Meaning a where statement is executed on the storage tier and only the filtered results are send back. In a traditional way all the data would be send to the database server and the filtering would be done on the database server. By working like this you will have less CPU time on the database server which enables the database to handle more calls and there will be less raw data-traffic.

By doing this online transaction processing and real-time query operations on life data sets will have a huge benefit. Because you will have more than one 'cell'/ 'storage bay' with its own CPU and all the disks in a cell will work in parallel you will be able to run large numbers of very complex queries without having to compromise on the performance of your system. To make optimal use of the ExaData architecture a Oracle 11g database should be used.

Oracle database 11G is equipped with iDB in the kernel. iDB stands for the Intelligent Database protocol and is build on the industry standard Reliable Datagram Sockets protocol RDSv3. The protocol runs over InfiniBand. ZDP (Zero-loss Zero-copy Datagram Protocol), a zero-copy implementation of RDS is used to eliminate unnecessary copying of blocks. Multiple network interfaces can be used on the database servers and Exadata cells. This is an extremely fast low-latency protocol that minimizes the number of data copies required to service I/O operations. iDB is used to ship SQL operations down to the Exadata cells for execution and to return query result sets to the database kernel. Instead of returning database blocks.

Reliable Datagram Sockets is a open standard under GPL license and is maintained by The OpenFabrics Alliance. Oracle is running a couple of projects on RDS, for example you can check this oss.oracle.com site on the performance and testing results of RDS.

Thursday, September 25, 2008

Oracle Exadata Storage Server

Oracle is getting into hardware. Larry today announched that they have created in combination with HP the world’s fastest hardware for running databases and especially data warehouses: the Exadata Storage Server.

With databases and data warehouses getting bigger and bigger and well above the 1 Tb limits Oracle found that they also have to optimize the hardware to provide customers with a good and well preforming application. Because of this they have developed with HP the Exadata Storage Server. First see the movie below and I will post more details on this weblog in the next post.


shared-everything or shared-nothing

I just stumbled upon a blogpost on the weblog of Julian Hyde. Julian is discussing shared-everything and shared-nothing architectures and the way Oracle is handling things in this area. I just started ringing bells in my head about Massive parallel processing and how Google is working things like this. It is a great article you should read when you are interested in developing database grids and such. It is not a tech deep article as such, however it is giving a good idea about all those things you might already know but which you do not use and think about every day.

Good starting point to get back into cluster architecture thinking. Because I am currently getting back into thinking about how you can run a datacenter as efficient as possible with as much computing power per system as possible and the same time cutting down hardware costs and save some power this is quite interesting stuff.

Oracle powers computers on humans

No this is not The Matrix becoming reality, this is a nice way from Oracle to make people aware on how much power they are spending. Currently Oracle is having the Oracle OpenWorld conference. Oracle OpenWorld is the biggest event Oracle launches every year and this year at part of the conference is about how you can reduce power in the datacenter. Look for example at the power savings you can have when using Oracle VM instead of having a server in your rack for every little application you have running in your company.

One of the ways at OpenWorld to make you energy aware is that you have the option to charge your laptop and or cellphone by human power. You can peddle a bike and in the same time charge you laptop batterie. Judi Sim stated "We can't generate enough for the whole show, but it's our goal to grow the program, we've gone significantly deeper in trying to run this meeting in a more sustainable way." Judi is a chief marketing officer at Oracle.

So when you see some people on a bike somewhere around the Moscone Center it could very well be that they are not trying to commute and use the bike so they do not have to deal with traffic jams, it could very well be that they are just charging there laptop batteries.

Tuesday, September 23, 2008

Oracle VM and storage solutions

The past couple of days it is raining information about all the hardware vendors who are launching products that are certified and/or developed to use with Oracle Enterprise Linux and Oracle VM. Qlogic announced the launch of certified FC equipment, Compellent launched some information about how to use there storage solution in combiantion with Oracle VM, NetApp has launched a whitepaper on how to use NetApp in combiantion with oracle VM.

And now Pillar Data Systems released a pressrelease named: "Pillar Data Systems Announces New Application-Aware Storage Profiles for Oracle Database Environments". You can read the complete press-relase on businesswire.com

Oracle And Amazone

Oracle and amazon.com are teaming up to provide amazone's Elastic Compute Cloud customers more functionality. The Amazone Elastic Compute Cloud is a web-service provided by amazone.com which enables developers to create applications 'in the cloud', online a scale the running platform as they build. If you want to add more processor power, virtual memory or disk space to your application you can use the control panel to change the environment of your application.

Oracle announced that it will certify/support deployments of Oracle Database (all editions), Oracle Enterprise Linux, Oracle Enterprise Manager, and Oracle Fusion Middleware to Amazon Web Services' (AWS) Elastic Compute Cloud (EC2). In fact you may transfer your existing licenses to AWS if you like.

This will enable developers who where previously not able to use the amazone cloud, because they needed Oracle databases to run there program, to pick amazone as the platform of their choice. I found this new information on the weblog of justin kestely who is currently attending Oracle Open World.

Monday, September 22, 2008

Compellent storage and Oracle VM

"Compellent Supports Oracle(R) VM to Deliver Advanced, Virtual Storage and Server Infrastructure". Compellent today announced that they will expand their products and services in such a way that it will optimally work with Oracle VM. This, in combiantion with the announchement today from Qlogic that they now will ship Oracle VM certified hardware, will make the adoption of Oracle VM and Oracle Enterprise Linux in 'high storage demanding' enviroments even more logical. Besides this it is also giving a good alternative for those customers who like to have an other storage solution than using EMC or NetApp.

"Compellent and Oracle are aligned in our approach to helping organizations realize the full benefits of a virtual enterprise, and we work together to certify and provide solutions that are seamlessly interoperable," said Bruce Kornfeld, vice president of marketing, Compellent. "Oracle's expertise on the server side, and our storage credentials, are enabling companies to improve performance and availability of business critical applications while reducing costs and simplifying IT management."

QLogic certified for Oracle VM

Today QLogic announced that QLogic Converged Network Adapter and 8Gb Fibre Channel Products Certified With Oracle Enterprise Linux and Oracle VM. QLogic FCoE Adapters and 8Gb Fibre Channel Adapters and Switches to be Showcased At Oracle OpenWorld in San Francisco.

FCoE stands for Fibre Channel over Ethernet. FCoE provides an opportunity to reduce data center costs by converging data and storage networking. Standard TCP/IP and Fibre Channel traffic can both run on the same high speed 10Gbps Ethernet wire, resulting in cost savings through reduced adapter, switch, cabling, power, cooling, and management requirements. FCoE has gained rapid market traction because it delivers excellent performance, reduces data center TCO, and protects current data center investment.

This means that we will now have complete certified FC capability to provide our customers when they are using Oracle Enterprise Linux and/or Oracle VM.


Sunday, September 21, 2008

Oracle Connector for Outlook

Oracle has release new plugins to connect to Oracle Collaboration Suite. Now we have finanlly support for the newest Outlook versions of Microsoft.

Supported versions are now:
Microsoft Outlook 2007 (with Service Pack 1)
Microsoft Outlook 2003 (with Service Pack 3)
Microsoft Outlook 2002 (with Service Pack 3)
Microsoft Outlook 2000 (with Service Pack 3)

Besides this Oracle also released Oracle Desktop Clients for Oracle Calendar for Mac os X, Windows, Linux and Solaris. You can find more information and links where to download at the Oracle website.

Wednesday, September 17, 2008

Linux, consolidate root mail

When operating large numbers of linux servers you also will have by default on every server a mailbox. We just recently made a switch for a large number of server to move to Oracle Enterprise Linux. This made us rethink some things and look again at some problems we have had in the past. One of the 'problems' was that administrators where checking the mails send to root on all the servers.

Now some of the servers are just running with a very long uptime and do not need a lot of maintenance so it could happen that the root mailbox became quite large. Also a lot of messages send to the local root user where overlooked and no action was taken upon the messages because it was not causing any problem. The new approach we chose after switching to Oracle Enterprise Linux was to consolidate all mails into a shared mailbox.

So we are now forwarding all mails that where originaly send to the local mailbox of root to a account root@somedomain.com . To do so you have to make a change in /etc/aliases . Somewhere at the bottom you will most likely find something like:

# Person who should get root's mail
#root: marc

Change this to
# Person who should get root's mail
root: root@somedomain.com

Save the file and type the following command: newaliases
Newaliases rebuilds the random access data base for the mail aliases file /etc/aliases. It must be run each time this file is changed in order for the change to take effect. Newaliases is identical to ‘‘sendmail -bi’’.

You now can test if all is working as expected by sending a mail to user root from the command line. You should receive the mail in your root@somedomain.com mailbox. This way you can consolidate the mails send out by the system and you can more easily get a overview of what is happening on your systems.


Tuesday, September 16, 2008

Installing Oracle VM Manager

When thinking about virtualizing your servers Vmware comes to mind almost immediately, however Oracle is now providing you a fork of XEN. XEN is already for years a proven opensource solution for virtualization and now Oracle has made a Oracle specific fork of the product.

The obvious reasons to start with virtualization is first of all from a IT management prespective that you can simply run multiple enviroments on one server. This means you can give a group of developers all a server of there own without the need to have the same amount of servers hanging in your datacenter racks. The creation of a virtual server can be done in a matter of minutes if you have a good infrastructure and good management tools. You can think about a thousand more possible reasons why you would like to have a virtual server, start thinking about all those servers that are running only a small task but need a complete 'hardware' server and operating system.... you can do the math yourself.

Eliminating a large number of 'hardware' servers can result in a large reduction of costs of hardware maintenance and reduces the costs of power and backup power.

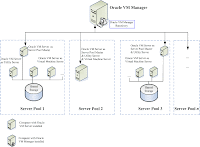
However, to make full use of your virtualization solution you need some good management tools, Oracle is proving you with Oracle VM Manager. Oracle VM Manager is a web-based system where you can control and provision virtual servers and server pools. Oracle VM Manager runs on Oracle APEX and is not needing a lot of resources so a minimum of hardware requirements is sufficient. One of the great things about installing Oracle VM Manager is that it can be completed in a couple of minutes and that it can be done without invoking a graphical enviroment, the complete installation is done via the command line interface.

I installed Oracle VM manager on a fresh install of Oracle Enterprise Linux 'guided' by the manual from Oracle. The Oracle manual is almost correct, however I needed some tricks to get some things done. You can find the original manual I used on the oracle website.

These are the steps I took to install Oracle VM Manager:

Step 1:
Download the Oracle VM Manager from the Oracle E-Delivery website and store it on the file system you like to install the Oracle VM Manager. The package you need to download is V13800-0

Step 2:
Unzip the downloaded package, it will contain a ISO file, you do not need to burn it to a cd, you can directly mount it to the file system. To mount the iso to the file system take the following steps:
# mkdir /setup
# mount -o loop,ro OracleVM-Manager-2.1.2.iso /setup

Step 3:

Go into the directory setup and execute the runInstaller.sh script. The runInstaller.sh script is for some reason not executable by default and because you mounted the iso file the system will see it as a read only media so you have to execute it by using the following command:
sh runInstaller.sh
Now you will enter the interactive setup menu and all you have to do is to answer some questions.

Step 4:
Please enter the choice: [1|2|3]
1. Install Oracle VM Manager
2. Uninstall Oracle VM Manager
3. Upgrade Oracle VM Manager
Because we would like to install a new Oracle VM Manager we will pick 1

Step 5:
Do you want to install a new database or use an existing one? [1|2]
1. Install a new Oracle XE database on localhost
2. Use an existing Oracle database in my network
Because we have a fresh installed Oracle Enterprise Linux operating system and we like to keep the database on the same host as the Management tool we pick 1.

Step 6:
Please enter the port of listener:
Please enter the password for database account 'SYS':

Set default database schema to 'OVS'.
Please enter the password for account 'OVS':
Confirm the password:

You have to give some information about passwords, just pick a good password. More information about what a good password is can be found here:
http://www.lockdown.co.uk/?pg=password_guide

Step 7:
Oracle Database 10g Express Edition Configuration
-------------------------------------------------
This will configure on-boot properties of Oracle Database 10g Express
Edition. The following questions will determine whether the database should
be starting upon system boot, the ports it will use, and the passwords that
will be used for database accounts. Press to accept the defaults.
Ctrl-C will abort.

Specify the HTTP port that will be used for Oracle Application Express [8080]:
Specify a port that will be used for the database listener [1521]:

You can just accept the default settings, or if you really want you can take some different ports.

Step 8:

Specify a password to be used for database accounts. Note that the same password will be used for SYS and SYSTEM. Oracle recommends the use of different passwords for each database account. This can be done after initial configuration:
Confirm the password:

Provide the system with a password for the database user SYS and SYSTEM.

Step 9:

Do you want Oracle Database 10g Express Edition to be started on boot (y/n) [y]:

Pick the default, which is yes. You most likely do want to have it started during boot. This makes sure that after a complete power outage you do not need to worry about brining up you manager. You will need the time to fix all the other problems which comes with a sudden power outage.

Step 10:
Set default database schema to 'OVS'.
Please enter the password for account 'OVS':
Confirm the password:

Set a password for the database schema OVS, the password must begin with an uppercase or lowercase letter. The password may include the following characters: numbers (such as 1, 2, 3, and so on), letters (from a to z, A to Z), and underscores (_).


Step 11:

Installing the ovs-manager package (rpm) ...Done
Installing the oc4j package (rpm) ...Done
Please enter the password for account 'oc4jadmin':
Confirm the password:
Please enter the password for the default account 'admin':
Confirm the password:
Configuring SMTP server ...
Please enter the outgoing mail server (SMTP) hostname:
Please enter an e-mail address for account 'admin':
Confirm the e-mail address:

Set a password for the oc4jadmin account and the admin account. Also provide the hostname (or IP address) of you SMTP server so the system can send out emails. Also provide a e-mail account for the person who will be the administrator.

This is the final step, the person who you granted the administrator role by giving his e-mail address will now have received a mail with the location where to login and some credential information. This should have done the trick. However, in my case there was a default iptables rule which made it impossible to access port 8888. After I disabled the iptables I was able to login to the system from a remote computer. To shutdown the iptables firewall you have to enter the following command:
service iptables stop

Oracle Enterprise Linux, adding swap

When working with Oracle products and especially when you are testing Oracle products you might find yourself in a position where you have to add more swap memory to your Linux system. I encounterd this 'problem' just now when I added more memory to my virtual machine which is running Oracle Enterprise Linux. Because I added more 'RAM' memory to the virtual machine the I did no longer have the double the amount of RAM as I did have swapspace.

This is a common rule, for example if you have 64MB of RAM you will like to have 128MB of swapspace. This 'rule' is not always valid and can vary per platform, operating system and software you are running on the box, it is however a good first guideline to setup your system. So I had to add 2048MB of swapspace to my system.

The most simple way is to use swapfiles, there are basilcy two ways of handling the adding of extra swapspace. The first is to add a new swap partition the second is to add swapfiles. Because this is a test enviroment I used the second.

First create a file you will be using as you swapfile, this is done by the following command:
dd if=/dev/zero of=/swapfile bs=1024 count=2097152

bs stands for block size and we set the blocksize to 1024. Because we would like to add 2048MB of swap we calculate it by multiplying the required size in MB's by the blocksize, the result is the count.

After the file is created you setup the swap file by issuing the following command
mkswap /swapfile

And activate it by:
swapon /swapfile

Swapon is used to specify devices on which paging and swapping are to take place. The device or file used is given by the specialfile parameter. It may be of the form -L label or -U uuid to indicate a device by label or uuid. Calls to swapon normally occur in the system multi-user initialization file /etc/rc making all swap devices available, so that the paging and swapping activity is interleaved across several devices and files.

Now your new swapspace is active, however, next time you boot your system the swap files will not be mounted to the system. To make sure the next time the files are mounted and ready to use you have to add them to your /etc/fstab file where you control what is mounted at startup. Fstab stands for file systems table. The file is commonly found on Unix systems as part of the system configuration. The fstab file typically lists all available disks and disk partitions, and indicates how they are to be initialized or otherwise integrated into the overall system's file system.

The fstab file is most commonly used by the mount command, which reads the fstab file to determine which options should be used when mounting the specified device.

Traditionally, the fstab was only read by programs, and not written. However, some administration tools can automatically build and edit fstab, or act as graphical editors for it, such as the Kfstab graphical configuration utility available for KDE. Modern systems use udev to handle hot swapping devices instead of rewriting fstab file on the fly. It is the duty of the system administrator to properly create and maintain this file.


Friday, September 12, 2008

Vmware server console on Ubuntu hardy

Installing the VMware server console on Ubuntu hardy is quite simple. You can download the packages from the vmware website. After you download the package and extracted everything you have to run (as root, so do a sudo) vmware-install.pl

You can almost do everything as the installer suggest. The trick is however in the post installation steps. You might end up after installing the vmware server console on ubuntu with the following errors when you try to start the console:


jlouwers@NL-jlouwers:/etc/vmware$ vmware

/usr/lib/vmware/bin/vmware: /usr/lib/vmware/lib/libgcc_s.so.1/libgcc_s.so.1: version `GCC_3.4' not found (required by /usr/lib/libcairo.so.2)

/usr/lib/vmware/bin/vmware: /usr/lib/vmware/lib/libgcc_s.so.1/libgcc_s.so.1: version `GCC_4.2.0' not found (required by /usr/lib/libstdc++.so.6)

/usr/lib/vmware/bin/vmware: /usr/lib/vmware/lib/libgcc_s.so.1/libgcc_s.so.1: version `GCC_3.4' not found (required by /usr/lib/libcairo.so.2)

/usr/lib/vmware/bin/vmware: /usr/lib/vmware/lib/libgcc_s.so.1/libgcc_s.so.1: version `GCC_4.2.0' not found (required by /usr/lib/libstdc++.so.6)

/usr/lib/vmware/bin/vmware: /usr/lib/vmware/lib/libgcc_s.so.1/libgcc_s.so.1: version `GCC_3.4' not found (required by /usr/lib/libcairo.so.2)

/usr/lib/vmware/bin/vmware: /usr/lib/vmware/lib/libgcc_s.so.1/libgcc_s.so.1: version `GCC_4.2.0' not found (required by /usr/lib/libstdc++.so.6)


The solution to solve this problem is to execute the following 2 commands:


sudo cp /lib/libgcc_s.so.1 /usr/lib/vmware/lib/libgcc_s.so.1
sudo cp /usr/lib/libpng12.so.0 /usr/lib/vmware/lib/libpng12.so.0

Now when you start the vmware client all should work fine.

Thursday, September 11, 2008

Controlling Linux printers for Oracle E-Business Suite


At SmartApps we are controlling a large number of Linux servers running all kind of Oracle Products. Also we do host Oracle E-Business Suite for customers in the datacenter in the Netherlands where customers connect to remotely via secure encrypted 'lan to lan' connection.

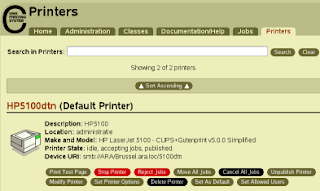
To enable them to use printers which are located in the customers office we do use the 'almost' standard solution of CUPS. CUPS stands for Common Unix Printing System and controls the local and network printers. Because companies do change a lot of printers, departments move around buildings, and new printers are added. This makes controlling network printers sometimes a time consuming job. Besides this you also have printers failing, connection problems and other things.

Printers can be controlled in several ways, you can control them via the UNIX command line or you can use the web interface. Because not everyone is evenly good at command line we have chosen to also give all SmartApps employees who take customer calls and do customer environment setup work access to the CUPS webinterface.

When you standard install cups you will have the webinterface running on port 631 and this will only be available for localhost. So if you like to make it available for all people you have to change a couple of things in the cups configuration. The configuration can by default be found in /etc/cups/cupsd.conf

Lookup the allow section in the configuration, you will most likely find a line that looks something like:
Allow localhost
Change this to
Allow all

and lookup “Listen localhost:631” This you have to change to Listen *:631

now all you have to do is stop start the cups daemon and you can access port 631 via the remote address. You can limit the people who can access the cups interface by changing Listen *:631 to a syntax where you set only the IP address who are allowed to access the cups interface.


Monday, September 08, 2008

PL/SQL developer on Linux

I have made the decisions to switch from a windows work laptop to a Linux laptop. At some points this can be hard, for example I use a tool called PL/SQL Developer from allroundautomations. I use the tool to code PL/SQL code for Oracle and is one of the things I start at first in the morning; mail, Firefox and then PL/SQL Developer. So switching to a Linux only laptop was challenging because I needed to get this windows program running under windows.

To run windows applications on a Linux box you can use wine, Wine is an Open Source implementation of the Windows API on top of X, OpenGL, and Unix. So I installed wine and gave myself a windows runtime enviroment. The following steps to make PL/SQL developer run under windows are:

Download and unpack (no need for installation) the Oracle instant client package which you can download from the oracle website and place this in your virtual C drive.

Next step, create a location to store you TNSNAMES.ORA file. I have placed it inside the instant client directory.

Now you have to make some changes to the system.reg file of wine. Here are settings stored which are used in 'windows'. You have to set the location of your TNSNAMES.ORA file as a TNS_ADMIN variable and you have to set the location of the instant client in the PATH variable. This made in my case the following:

[System\\CurrentControlSet\\Control\\Session Manager\\Environment] 1220471456

"APPDATA"="C:\\windows\\profiles\\jlouwers\\Application Data"

"ComSpec"=str(2):"C:\\windows\\system32\\cmd.exe"

"LOCALAPPDATA"="C:\\windows\\profiles\\jlouwers\\Local Settings\\Application Data"

"NUMBER_OF_PROCESSORS"="2"

"OS"="Windows_NT"

"PATH"=str(2):"C:\\windows\\system32;C:\\windows;C:\\instantclient_11_1"

"PROCESSOR_ARCHITECTURE"="x86"

"PROCESSOR_IDENTIFIER"="x86 Family 6 Model 15 Stepping 13, GenuineIntel"

"PROCESSOR_LEVEL"="6"

"PROCESSOR_REVISION"="0f0d"

"ProgramFiles"="C:\\Program Files"

"SystemDrive"="c:"

"SYSTEMROOT"="C:\\windows"

"TEMP"=str(2):"C:\\windows\\temp"

"TMP"=str(2):"C:\\windows\\temp"

"TNS_ADMIN"="c:\\instantclient_11_1\\tns"

"windir"=str(2):"C:\\windows"

"winsysdir"="C:\\windows\\system32"


Now you also have to set some things in PL/SQL developer itself to make things work correct. Install PL/SQL developer, this should go without any problem. After you installed it open PL/SQL developer and go to the preferences menu. Under 'Oracle' – 'Connections' set the Oracle Home. In my case this was 'C:\instantclient_11_1' and set the location of the OCI library, in my case this was 'c:\instantclient_11_1\oci.dll'. The last thing you have to do is to uncheck 'faded disabled buttons' under 'User Interface' – Apperance. This is to solve the problem of some menu items not displaying.

When this is set, restart PL/SQL developer and you are able to use like it was installed on a windows pc.


Sunday, September 07, 2008

Ubuntu and Cisco VPN clients

I recently decided that I would abandon Windows completely and start using only Linux as a desktop environment for my work laptop. At home I already used Linux on a majority of the workstations and even my girlfriend is using Linux on here laptop. However, using a Linux workstation in a corporate environment can be somewhat hard if the rest of the company is still sticking with Windows.

So I have hade some problems to solve and one of them was the connection to the office and the datacenter. We use cisco PIX equiopment to give remote users access to the office so they all have a Cisco VPN client installed. I have checked the Cisco website and the amount of Linux tools they are offering was somewhat disapointing. I found a part of the solution written by Tyler on his longren.org weblog.

However, I did have some problems when I followed his setup steps when I tried to install it on Ubuntu hardy (Ubuntu 8.04.1). To check the version of Ubuntu enter the following command: lsb_release -a

The problem was that I got the following error during the making of the module:

Making module
make -C /lib/modules/2.6.24-16-generic/build SUBDIRS=/home/igfud/Desktop/vpnclient modules
make[1]: Entering directory `/usr/src/linux-headers-2.6.24-16-generic'
CC [M] /home/igfud/Desktop/vpnclient/linuxcniapi.o
In file included from /home/igfud/Desktop/vpnclient/Cniapi.h:15,
from /home/igfud/Desktop/vpnclient/linuxcniapi.c:31:
/home/igfud/Desktop/vpnclient/GenDefs.h:113: error: conflicting types for ‘uintptr_t’
include/linux/types.h:40: error: previous declaration of ‘uintptr_t’ was here
make[2]: *** [/home/igfud/Desktop/vpnclient/linuxcniapi.o] Error 1
make[1]: *** [_module_/home/igfud/Desktop/vpnclient] Error 2
make[1]: Leaving directory `/usr/src/linux-headers-2.6.24-16-generic'
make: *** [default] Error 2
Failed to make module "cisco_ipsec.ko".

After some searching I found the solution. So if you experiencing the same problems you can try and follow the following steps:
  1. Download vpnclient-linux-x86_64-4.8.01.0640-k9.tar.gz from the tux-home.at website.
  2. Extract the downloaded archive with tar xzf
  3. Download the patch from the tux-home.at website, this is patch vpnclient-linux-2.6.24-final.diff
  4. go into the new directory created by extracting the client and apply the diff patch by executing the following command: patch <>
  5. Now start the installer by exectuting: sudo ./vpn_install
This is all it takes to install the VPN client. You might want to install you pcf profiles. This can be done by simply placing them into /etc/opt/cisco-vpnclient/profiles/

You can start a VPN session by executing the following command: sudo vpnclient connect myprofile (if your profile is named myprofile).

You have to make sure that the vpn client itself is started. you can find the start/stop script in /etc/init.d however to make things more easy for myself I have created a script for every connection I have. You might want to use the same approuche, the script is below so you can edit it to your own use:

#!/bin/bash
echo init the vpnclient
echo
/etc/init.d/vpnclient_init restart
echo
echo vpnlient process started
echo
vpnclient connect myprofile

Make sure you start the script with a sudo.

Saturday, September 06, 2008

Install Java j2re 1.4.2_04 on Ubuntu

Some applications we are currently running forced me to have J2RE (Java Runtime Environment) version 1.4.2._04 installed under Ubuntu.

You can still download old versions of Java from the Sun Microsystems website, you only have to go to the archive section to be able to do so. So I downloaded the file j2re-1_4_2_04-linux-i586.bin to install the runtime environment on my laptop. However then I ended up in having some problems.

I did the following steps:
(1)wget the file from the sun site.
(2)Made sure that it was executable by executing chmod +x ~/Desktop/j2re-1_4_2_04-linux-i586.bin
(3)and started the installation with ./j2re-1_4_2_04-linux-i586.bin

First you will get a long Binary Code License Agreement which you have to 'read' and finally approve, however after that I got the following error:


Do you agree to the above license terms? [yes or no]
yes
Unpacking...
tail: cannot open `+417' for reading: No such file or directory
Checksumming...
1
The download file appears to be corrupted. Please refer
to the Troubleshooting section of the Installation
Instructions on the download page for more information.
Please do not attempt to install this archive file.
jlouwers@NL-jlouwers:~/Desktop$

Which stated an error by executing the tail command. This version of Java is a somewhat older version and has a command in the installer which is no longer valid with newer release of the tail command. The tail command is used in the installation script, which is on the top of the bin file, to do a checksum to make sure that the archive you are installing is valid. This to prevent that you install a archive that has been corrupted during downloading or is tampered with before you downloaded it. Now if you are sure that the packet is valid, and you can be quite sure of that when you download it from the sun download website you can solve this problem by editing the installation script inside the .bin file.

You can edit it by using vi. When you open the file in vi you will find the problematic tail command on line 276 stating “tail +417 $0 > $outname”. After this line you enter a if, else fi statement. To solve the problem edit line 276 and comment out line 277 until line 302. So your installation script should look like the following:

tail -n +417 $0 > $outname
#if [ -x /usr/bin/sum ] ; then
# echo "Checksumming..."
#
# sum=`/usr/bin/sum $outname`
# index=1
# for s in $sum
# do
# case $index in
# 1) sum1=$s;
# index=2;
# ;;
# 2) sum2=$s;
# index=3;
# ;;
# esac
# done
# if expr $sum1 != 13852 || expr $sum2 != 13822 ; then
# echo "The download file appears to be corrupted. Please refer"
# echo "to the Troubleshooting section of the Installation"
# echo "Instructions on the download page for more information."
# echo "Please do not attempt to install this archive file."
# exit 1
# fi
#else
# echo "Can't find /usr/bin/sum to do checksum. Continuing anyway."
#fi

“tail -n +417 $0 > $outname” is a valid statement which can be used with the current releases of the tail command and the checksum part is 'removed' from the installation script. If you now execute the installation all should be fine. This is how you can install the Java Runtime Environment on the latest release of Ubuntu. Even do you have to do some things, installing Java on Debian like systems has improved a lot, you can check an older post from some time ago where you can see that installing Java on Debian for example was quite a bit harder. For a complete guide on how to install it, without the code fix part, can be found on this website. This however will not succeed without the code fix when you have a newer version of tail.