When we are thinking about setting up a new Oracle E-Business Suite Release 12 instance (or any other version) you will have to spend some time about thinking how you will arrange items. I have already pointed out some things in previous posts on why this can be very handy in a later stage when you are in production and people are using Oracle E-Business Suite in a day to day working situation.
A good starting point is when you start thinking about which items are alike, this comes in handy when you start thinking about Item Templates which can come in handy when you create new items. One other thing you can think about at that point is Item Catalog Groups. With Item Catalog Groups in Oracle you can catalog your items in groups and add extra information to your items based upon the category the items is related to.
Creating catalog groups and placing items in catalog groups will have several benefits. One of them obviously is that you will be able to group items and search within groups. Other benefits are that you will be able, for example, add more information which is relevant only for the items within this group and you will be able to automatically create aĆ’ item description based upon this. So this will also help you bring uniformity in the way you create your item descriptions.
To be able to do so you first will have to create a Catalog Item group within Oracle Inventory. To do so navigate to "Setup", "Items", "Catalog Groups". Here you will be able to view, edit and create new catalog groups.
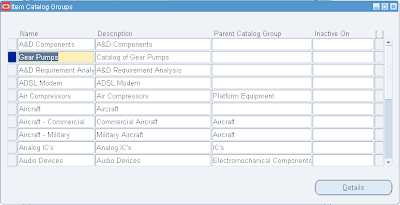
As shown in the above screenshot I created a new Catalog Group in Oracle Inventory named "Gear Pumps" which will hold all the items which are gear pumps. Or in other words, in alter stage I will assign the Catalog Group "Gear Pumps" to all the existing items who are gear pumps. If you create a new group, save it and click on the Details button you will be able to set more options.
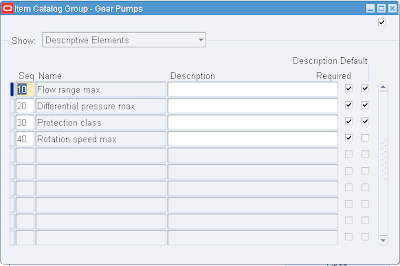
As you can see in the above screenshot I have set some details for this Item Catalog Group. I have been adding Descriptive Elements. Descriptive Elements are used per Item. In this case I have chosen 4 Descriptive Elements which can be set for all the items which will be placed this Item Catalog Group. The sequence is deliberately defined as 10, 20, 30, 40 because in this case I can easily add a record in the middle without having to change all the sequences of the existing records. This is in general a good idea to do. I also have set for all 4 of the Descriptive Elements that they are required so when a item is added to the group you have to set it. Only for 3 of the 4 I have set that it is a Description Default. When you set a Descriptive Element to Description Default it will be by default used to generate you description.
When you like to add a item to a Item Catalog group you go to the Item Master and query the item, then go to the Tools menu and select Catalog. you will be presented with a screen similar as in the screenshot below.
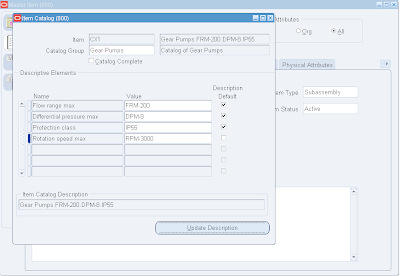
In this case I have selected the Item Catalog Group I created " gear Pumps" in the top "Catalog Group" field. When you select it you will be presented with a list of all the available and active Item Catalog Groups. After filling all the requierd fields for the Descriptive Elements, in this case all, you can use the Update Description button which will fill the item description with the generated "Item Catalog Description" based upon the catalog name and the descriptive elements in combination with their sequence. This is how you can generate standardized item descriptions. You do however have the possibility to change and edit the description so you will ne bound to the generated description. If you set this up smartly however it can be very beneficial.
The personal view on the IT world of Johan Louwers, specially focusing on Oracle technology, Linux and UNIX technology, programming languages and all kinds of nice and cool things happening in the IT world.
Thursday, April 30, 2009
Monday, April 27, 2009
Oracle R12 eBS Item Templates
When creating items in Oracle E-Business Suite R12 there are a lot of options you can set for a item. Numerous of attributes can be set for a item and also numerous of items can be set incorrect for a item which can result in problems later in the process.
because you are able to control so much attributes from a item Oracle has some controls in place, for example some attributes of a item can only be controlled at "Item Master" level and some can be controlled at organization level. This makes is so that some people, the people maintaing all the items, can control some parts of the item and some can be controlled by the organization who is using the item. When a item attribute is controlled on item master level the settings are applied for all organizations. When a attribute is controlled at organization level this attribute is only set for the current organization so you can have some localization on your item settings. This can come in handy when you for example would like to provide the option to change the way it is stocked or the min/max planning settings.
however, even do we have this security in place we still have a issue on the moment that a item is entered. As in many cases the initial creation of a item is still done by humans we do have a weak link. Humans are making mistakes and when setting up a item you can make lots and lots of mistakes. When you start thinking about your items you will be able to create a couple of standard groups in which most settings are the same, for example, purchase items, service items, digital items, internal items, etc etc etc. all having their own basic setup. Because of this Oracle created Item Templates. You can create Item templates and use them every time you create a new item to make the number of human error's decrease.
As shown above I am trying to create a new item in Oracle Inventory by using a item template. you can do this by simply start creating a new Item and before you do anything click "tools" from the menu bar and select "Copy From" from the dropdown menu. When you select this you will be able to pick the Item template you would like to use.
You can setup your item templates in Oracle Inventory and navigate to "Setup", "Items", "Templates". Here you will have the ability to search for existing templates or create a new template when needed.
When you start with the setup of your instance and blueprinting you will notice that creating the blueprint for your Item Templates will take some time. However, when it is in place you will know for sure that the people who have to create and maintain the items will be so happy with this option and it will save them so much time, effort and money that it will make up for the initial time you have to spend on it.
When you look at the screen where you can create a new Item Template you will notice that you can select the values of every tab which is shown in the Item screen so for the easy of setup this can really help you. You can also see that it states where a attribute is controlled, on master level or on organization level which we have been discussing a couple of posts ago. Also you can set it enabled or disabled and you can set the default value. When you set a default value a user can set a other value so it is only a guideline in the template and it is not fixed. However this guideline will improve the productivity of users because they do not have to set all the attributes for a item but they can simply apply a template to a new item.
Python Format Specifier for Strings
When you are coding in python you can make use of the Format Specifier for Strings to format the output. In basic it is very simple to use when you like to manipulate your output. For example if we want to make "Your name is; Johan" we can do a print command as seen in the previous post however we can also do it a little different.
we can do a print "your name is: %s" % ("Johan") as seen in the example below
this will give us some more freedom in formating we now can for example manipulate the position of the first string which is represented by %s by adding a 10 between the % and the s which will make sure that there is space for a word of 10 characters. However he name Johan is 5 characters wide so it will leave space for 5 more characters.
you can also play around with adding a + or a - in front of the 10 so it will read +10 or -10. Just try it out and have some fun finding out how it works in detail.
Python string printing
Learning basic Python, it is a new task I am starting, I want to learn myself some basic Python programming. I have already knowledge of nuerous other programming language and python is in basic skills one of them. However, this evening something new happend, my girlfriend started to skim my books and started to read one of the Linux books I have. She is already for some time a Linux user however only on the GUI side and now wanted to learn all about the system she started to love including how the system was buildup from the kernel and the way she was able to manipulate it. based upon the books we started a discussion about reading a computer book cover to cover. I stated that if she was going to finish a 600 page Linux book and work here way from cover to cover I would also start reading a computer book and finish it from cover to cover. My choice was a book on Python programming. As I will go along in the book I will blog about it.
So here is the first blogpost about me learning Python from reading the book cover to cover. I will tag those posts with "Python cover to cover" so you can keep up. And please do remember, nothing is to basic to blog about because there is always someone who is not knowing what you write down.
First part, basic string printing. As for most languages Python has a function called print to write output to your screen. In our case it will write a string value to the screen, so if I want to print the text This is a test. to the screen in Python I will use print "This is a test." with the result as can seen below:
So this is quite simple, now we can do some basic manipulations on the printing of the text, for example let say that behind the text we would like to have a tab and then some more text. this can be done with the escape character of Python \ and the command for a tab a t. So we will be using print "This is a test.\tSome more text." or even a couple of \t commands.
As we now understand the tab command we can also use the command for a new line which is \n which will give us a new line. so for example if we want to have a This is a new text. and on a second line the text "This is text on a new line" we will be using the command print "This is a newtext.\nThis is text on a new line"
Friday, April 24, 2009
Oracle 11G database replay options
Oracle Database 11G is providing a new future, database replay. What database replay in basics is doing is capturing all what is done in a database and provide you with a replay file which can be executed on a other database instance. So, even do this is a nice feature from a technical point of view, where can it be used for. A couple of examples:
(1) Tuning a Oracle database and the applications running on it can be a challenging job. Even do we have all kind of applications where we can tune SQL for example we always come to a point where we have to ask ourselves how will it be behave under production environment load. In most cases the new code is checked on bugs and placed on production to have a impression on the new speed of the code. In some cases test scripts are build to simulate a production load. With Oracle Database 11G database replay you now have the ability to capture real-life data for some time and run it on your development instance again and again until you are satisfied with the speed of your code.
(2) Building installation and setup scripts. We all know cases where we have to create tables, change some things, import some data and then redo the entire thing on a other server(s) for testing. In some cases you know that this is only a test and you are not yet ready to create official installation scripts, you just want to have it on multiple servers for testing. Now you can simply capture the steps and replay it on a second database instance.
(3) Something is wrong on a database instance and users are complaining that they have a issue. You now can capture the session and export it to a testing instance where you can use the data from the users session and play it over and over again until you found and solved the bug.You can think of numerous other useful options of Oracle database replay on Oracle 11G databases. So, how is it working. The concept is shown in the picture below:
1. You start a capture process that records activities against the database.
2. The process writes the activities to special files called "capture files" in a directory called /capture directory/.
3. After a while you stop the capture process and move these capture files to a test system in a directory called /replay directory/.
4. You start a replay process and several replay clients to replay all these capture files.
5. The capture files are applied against the test database. So how is it done. First of all we have to make sure we have a location to store the capture files somewhere on the fi
somewhere a new directory where we write access. In our case we will be creating /u01/app/oracle/replayfiles
mkdir /u01/app/oracle/replayfiles
Now we have to make it a directory in the oracle database:
CREATE OR REPLACE DIRECTORY db_replay
AS '/u01/app/oracle/replayfiles/';
Ok, if all is setup correctly we can start capturing for this we will be using dbms_workload_capture procedure, namely the dbms_workload_capture.start_capture and the dbms_workload_capture.finish_capture procedures. To start a capture use:
BEGIN
DBMS_WORKLOAD_CAPTURE.start_capture (name => 'capture_run',
dir => 'DB_REPLAY',
duration => NULL);
END;
/
And to stop the capture we use:
BEGIN
DBMS_WORKLOAD_CAPTURE.finish_capture;
END;
Even do it are some simple commands which can easily be invoked you can also use the Oracle Enterprise Manager GUI for this.
Wednesday, April 22, 2009
Oracle R12 global instance with RAC
LG Electronics is currently working on building a large scale global Oracle E-Business Suite Release 12 implementation wich should be ready in 2010. In combination with Oracle SOA Suite and Oracle WebLogic Portals the single instance will be capable of servicing complete LG Electronics. To make sure the systems will be up and running all the time LG is making use of a 4 node real application cluster which will be running the Oracle E-Business suite R12 instance. To be complete secure the entire storage, networking and all the servers are multiplexed to ensure the best uptime possible.
Even do the complete rollout is not yet completed large parts of LG Electronics are already making use of the R12 instance. Oracle has created a customer video which can be seen below. If you look into the customer successes PDF which is provided at the Oracle website you can see the massive amount of applications and options LG is using in their new R12 instance; Financials, Assets, Cash Management, Financial Analyzer, Supply Chain Management, Order Management, Purchasing, Advanced Pricing, Release Management, Manufacturing, Inventory Management, Human Resources, Payroll, Self-Service HR, Time & Labor, Learning Management, Real Application Clusters and SOA Suite.
Sunday, April 19, 2009
Oracle R12 Item attribute controls
When you setup Oracle E-Business suite and when you are thinking about items and items setup you might want to consider item attribute controls. If you have a company with more than one location which are defined as organizations in your Oracle E-Business instance you might not want to give all organizations the power to control all the attributes which can be set for a item.
In general the way that Oracle is handling items is that the items are created in a item master organization and after they are created they are assigned to the organizations who will do transactions with those items. If you have for example a master organization and organizations per country It is a good idea to give the country organizations the option to change the description of the item because they most likely will like to have the description in their own language. On the other hand the physical attributes like weight and dimensions will stay the same. To ensure that those settings are not lost you would like to control that on organization level they can change some things and other can not be changed.
To ensure this you can setup Item attribute controls. In the below screenshot you can see the screen where this is done in Oracle e-Business Suite Release 12 (oracle ebs R12).
Here you can set per tab/field for every item where it is controlled, on master level or on organization level. This can be controlled via the Inventory responsibility, go to Setup – Items – Attribute Controls. Here you will be presented with a screen similar as the screen below. This will allow you to set every item attribute to be controlled on master level or on organization level. Specialy for large companies who have a item information department this can be very handy. Also complicacy rules can ask for such security to be in place.
Wednesday, April 15, 2009
Oracle EBS R12 Supply Chain
Oracle just released some new certifications for Oracle E-Business Suite Release 12. For Oracle EBS R12 you now can start a certification for E-Business Suite R12 Supply Chain Certified Expert Consultant, Purchasing and for E-Business Suite R12 Supply Chain Certified Expert Consultant, Order Management.
The Oracle E-Business Suite Supply Chain Management family of applications integrates and automates all key supply chain activities, from design, planning and procurement to manufacturing and fulfillment. IT professionals need special skills to implement and manage critical supply chain related business processes. The Oracle r12 E-Business Suite Supply Chain Expert credential was created to help IT professionals gain recognition for skills obtained through training and experience. Those who become certified have a proven foundation necessary to help keep implementations on time and on budget.
Among topics that candidates must master are key components of Oracle Inventory Management including materials transfer, receipt to issue process, inventory organizations and inventory controls. Additionally candidates may specialize in either Oracle Order Management or Oracle Purchasing by choosing one of two required elective exams. Candidates who wish to pursue both paths may take both electives and upon successful completion will receive two separate credentials.
You will have to do certification exam (1Z0-225) or certification exam (1Z0-226). In all cases you also will have to pass Essentials exam (1Z0-204) which will be about Oracle E-Business Suite R12: E-Business Essentials . About this exame you can find the details at the Oracle website along with all the other information about the certification
Monday, April 06, 2009
OEL Linux X11 resolution 1440X900
For a project I am running Oracle Enterprise Linux on my Macbook. The resolution of my MacBook Pro is 1440X900 so I also want this as the resolution of my Oracle Enterprise Linux installation within virtualbox. After installing the guest additions from virtualbox I had to addapt the content of the file /etc/X11/xorg.conf . There are a lot of guides online and hints online, some of them work some of them are not working. At least the below content was working for me an made Oracle enterprise Linux running with a 1440x900 resolution on my macbook pro.
# Xorg configuration created by system-config-display
Section "ServerLayout"
Identifier "single head configuration"
Screen 0 "Screen0" 0 0
InputDevice "Keyboard0" "CoreKeyboard"
EndSection
Section "InputDevice"
Identifier "Keyboard0"
Driver "kbd"
Option "XkbModel" "pc105"
Option "XkbLayout" "us"
EndSection
Section "InputDevice"
Identifier "VBoxMouse"
Driver "vboxmouse"
Option "CorePointer"
EndSection
Section "Monitor"
### Comment all HorizSync and VertSync values to use DDC:
Identifier "Monitor0"
ModelName "LCD Panel 1440x900"
### Comment all HorizSync and VertSync values to use DDC:
HorizSync 31.5 - 56.0
VertRefresh 56.0 - 65.0
modeline "800x600@56" 36.0 800 824 896 1024 600 601 603 625 +hsync +vsync
modeline "800x600@60" 40.0 800 840 968 1056 600 601 605 628 +hsync +vsync
modeline "1280x768@60" 80.14 1280 1344 1480 1680 768 769 772 795 -hsync +vsync
modeline "1280x720@60" 74.48 1280 1336 1472 1664 720 721 724 746 -hsync +vsync
modeline "1280x800@60" 83.46 1280 1344 1480 1680 800 801 804 828 -hsync +vsync
modeline "1440x900@60" 106.47 1440 1520 1672 1904 900 901 904 932 -hsync +vsync
Gamma 1.0
EndSection
Section "Device"
Identifier "Videocard0"
Driver "vboxvideo"
EndSection
Section "Screen"
Identifier "Screen0"
Device "Videocard0"
Monitor "Monitor0"
DefaultDepth 24
SubSection "Display"
Depth 24
Virtual 1440 900
Modes "1440x900@60" "1280x800@60" "1280x720@60" "1280x768@60" "800x600@60" "800x600@56"
EndSubSection
EndSection
Subscribe to:
Posts (Atom)