Wednesday, September 21, 2016

Oracle Linux - retrieve openssh-key data from REST API

After posting my blogpost on the REST API within the Oracle Compute Cloud and how to use this from within Oracle Linux if you deploy on the Oracle Compute Cloud I received an email asking me how to handle the fact that the public-keys an contain multiple keys.

Public-keys response of the REST API provides SSH public keys specified while creating the instance, where{index} is a number starting with 0. public-keys/{index}/openssh-key

The provided example in the original post was on how You will be able to access the public-keys by executing the following curl command:

curl http://192.0.0.192/1.0/meta-data/ public-keys/{index}/openssh-key

This example is a command example and not a programmable example of how to implement code that can do this for you. As an example I have written the below code example and placed it on github. It provides a BASH script which can be used in conjunction with Oracle Linux. It will most likely run on other distributions as well without any issue however it is not tested.

#!/bin/bash
# NAME:
#   showsshkeys.sh
#
# DESC:
#   Example script to show how you can get the public keys for a instance
#   that have been promoted. Those keys can for example be used to create 
#   a new OS account with trusted keys. This is in a way the same as is 
#   done by the default Oracle templates who do create an "opc" account 
#   with the trusted keys for login which have been selected during the 
#   creation of the new instance. This is tested with Oracle Linux on
#   the Oracle Cloud.
#
# LOG:
# VERSION---DATE--------NAME-------------COMMENT
# 0.1       20SEP2016   Johan Louwers    Initial upload to github.com
#
# LICENSE:
# Copyright (C) 2015  Johan Louwers
#
# This code is free software; you can redistribute it and/or
# modify it under the terms of the GNU General Public License
# as published by the Free Software Foundation; either version 2
# of the License, or (at your option) any later version.
#
# This code is distributed in the hope that it will be useful,
# but WITHOUT ANY WARRANTY; without even the implied warranty of
# MERCHANTABILITY or FITNESS FOR A PARTICULAR PURPOSE.  See the
# GNU General Public License for more details.
#
# You should have received a copy of the GNU General Public License
# along with this code; if not, write to the Free Software
# Foundation, Inc., 51 Franklin Street, Fifth Floor, Boston, MA  02110-1301, USA.
# *
# */

# ccVmApiBaseUrl is used to access the root of the OPC API
 ccVmApiBaseUrl="http://192.0.0.192/"

# ccVmApiVersion is the main version of the OPC API used by the lib
 ccVmApiVersion="1.0"

# ccVmApiMaxWait is the max time (in seconds) the function will wait for a response from the api.
 ccVmApiMaxWait="5"

# The function ccVmGetNumOfPublicKeys will return the number of public keys
 function ccVmGetNumOfPublicKeys {
    ccVmNumOfPublicKeys="$(curl -m $ccVmApiMaxWait -f -s $ccVmApiBaseUrl$ccVmApiVersion/meta-data/public-keys/)"
    curlStatus=$?

    if [ "$curlStatus" -eq 0 ]; then
      echo $ccVMNumOfPublicKeys | wc -l
    else
        echo "ERROR"
    fi
 }

# The function ccVmGetPublicKeyType will return the public key type
 function ccVmGetPublicKeyType {
    ccVmPublicKeyType="$(curl -m $ccVmApiMaxWait -f -s $ccVmApiBaseUrl$ccVmApiVersion/meta-data/public-keys/$1)"
    curlStatus=$?

    if [ "$curlStatus" -eq 0 ]; then
      echo $ccVmPublicKeyType
    else
        echo "ERROR"
    fi
 }

# The function ccVmGetPublicSshKey will return the public key
 function ccVmGetPublicSshKey {
    ccVmPublicSshKey="$(curl -m $ccVmApiMaxWait -f -s $ccVmApiBaseUrl$ccVmApiVersion/meta-data/public-keys/$1/openssh-key)"
    curlStatus=$?

    if [ "$curlStatus" -eq 0 ]; then
      echo $ccVmPublicSshKey
    else
        echo "ERROR"
    fi
 }

 function runMain {
    # Get the number of keys available from the API. For this we will use the ccVmGetNumOfPublicKeys
    # function. 

    mainNumberOfKeys="$(ccVmGetNumOfPublicKeys)"

    # Loop through the number of keys found, check the type of the key and if the key type is correct
    # we will use it to add to the account so it can be used as a trusted key. The key type we are
    # looking for in this case is the openssh-key type to be used.

    i="0"
    while [ $i -lt $mainNumberOfKeys ]
     do
       pubKey="$(ccVmGetPublicKeyType $i)"
       if [ $pubKey = "openssh-key" ]
        then
         ccVmGetPublicSshKey $i
       fi
      i=$[$i+1]
     done
 }

runMain

The example shown above will provide you a list of public keys which are provided during the creation of the instance. It will execute the runMain function which in turn will call a number of other functions defined in the code.

The main reason for the function based program is that if you want to adopt this in a more complex scripting solution you do want to ensure you can make this a modular code instead of a monolithic script.


Please do check the latest version of the script at github, the above example code will not be maintained within this blogpost and all changes will be done on github. Meaning, bugfixes and improvements will not show above. 

Monday, September 19, 2016

Retrieving IaaS Instance Metadata with Oracle Linux

When creating a new IaaS instance in the Oracle Compute cloud Service you will notice that some information is pre-populated for you and some settings are done. For example, the hostname is set, it will have IP information and you will have the keys populated for the OPC account you have defined.

This is done by a first boot script provided by Oracle which will take information from outside the standard operating system and use it to configure the Oracle Linux instance to your liking. For this it will have to have access to a set of information which is not part of the deployment template as this is specific information for your deployment. The way it is doing it is by making use of the instance metadata which is provided by a REST API.

The rest API provides three sets of information;
  • attributes
  • meta-data
  • user-data
The meta-data is used during the first boot of the instance to ensure everything is configured to your needs. Oracle documentation describes this as follows:

"Two types of metadata are stored within your instances: user-defined instance attributes that you can define explicitly while creating instances, and predefined instance metadata fields that are stored by default for all instances. Scripts and applications running on the instances can use the available metadata to perform certain tasks. For example, SSH public keys that are specified while creating an instance are stored as metadata on the instance. A script running on the instance can retrieve these keys and append them to the authorized_keys file of specified users to allow key-based login to the instance using ssh."

When do you need the REST-API

Even though Oracle will take care of all post deployment configuration when you use a standard Oracle provided template the REST API is interesting in a number of cases.

  1. When you create your own custom template and you will have to build (or modify) a custom first boot script. 
  2. When you are building scripting to install certain specific software and are in need of information from the meta-data set. 

In the first instance you will most likely use primarily the meta-data information set, in the second instance you will most likely use a combination of both meta-data and user-data. The user-data set will enable you to provide (via additional JSON) information to the machine via the REST-API. For example, if you want to indicate if a certain application instance should be the master or a slave in a cluster you can use the user-data information set which will state the role of the machine. In this post we will focus on the meta-data information set and not the user-data information set provided via the REST API

In general, if you are building automation in your deployment model, in whatever way or form, you will at one point in time want to use the REST API.

How to access the REST API

The REST API is accessible from within your instance via the address 192.0.0.192 using http. This means that if you try to access http://192.0.0.192 you will be talking to the REST API. As you will not have a graphical user interface you will have to access that by using curl. An example is shown below of how to access the root of the REST API:

[opc@testbox08 ~]$ curl http://192.0.0.192
1.0
2007-01-19
2007-03-01
2007-08-29
2007-10-10
2007-12-15
2008-02-01
2009-04-04
latest
[opc@testbox08 ~]$

The REST API is compatible with the API you will see at for example at Amazon webservice, this makes it very easy for people who already have invested in automation and scripting based upon the standards developed initially by Amazon.

Based upon your preferences it is good practice to use latest or 1.0 as the version. To be fully sure that your automation scripting will always work and not break when a new latest version is launched it is advisable to use a specific version. In our case in the rest of the blogpost we will use the explicit version 1.0

As it is with REST API’s we can visualize the REST API in a tree shape. One thing you have to remember, even though the REST API provides a loosely compatibility with the Amazon REST API it is not the same. Oracle is also warning for this on the documentation itself in the following words:

You may see certain additional metadata fields, such as reservation-id, product-codes, kernel-id, and security-groups, that aren’t documented. Don’t retrieve and use the values in the undocumented fields

Reviewing the meta-data
The below meta-data components are available, all based upon version 1.0. While some are documented some are not and per statement from Oracle you should not rely on them while creating code.

[opc@testbox08 ~]$  curl http://192.0.0.192/1.0/meta-data
ami-id
ami-launch-index
ami-manifest-path
ancestor-ami-ids
block-device-mapping
instance-id
instance-type
kernel-id
local-hostname
local-ipv4
placement
product-codes
public-hostname
public-ipv4
public-keys
ramdisk-id
reservation-id
security-groups
[opc@testbox08 ~]$

Below is an explanation per meta-data component. The majority will work, however some will not work as you might be used to when using Amazon. You will also see that a number of components have the Amazon naming to ensure compatibility with code you might have created for Amazon.

ami-id
The AMI-ID provides you a unique ID for your IaaS instance. The name AMI-ID comes from Amazon Machine Image.

You will be able to access the ami-id by executing the following curl command:
curl http://192.0.0.192/1.0/meta-data/ami-idami-launch-index

ami-manifest-path
The ami-manifest-path is something that comes from Amazon and within Amazon it provides a path to the AMI manifest file in Amazon S3. In the Oracle Cloud this is not supported, a AMI manifest is a bit comparable with what oracle understands as a orchestration however not fully the same. As it is not supported by Oracle it wise to not base any scripting based upon this.

You will be able to access the ami-manifest-path by executing the following curl command:
curl http://192.0.0.192/1.0/meta-data/ ami-manifest-path

ancestor-ami-ids
This is by default not supported by Oracle Cloud and comes from the Amazon implementation of the API. The AMI IDs of any instances that were rebundled to create this AMI. This value will only exist if the AMI manifest file contained an ancestor-amis key. As it is not supported by Oracle it wise to not base any scripting based upon this.

You will be able to access the ancestor-ami-id by executing the following curl command:
curl http://192.0.0.192/1.0/meta-data/ancestor-ami-id

block-device-mapping
This provides within Amazon the mapping to the block devices used by the instance. However, within Oracle this is currently not support even though it is available as an object in the REST API. As it is not supported by Oracle it wise to not base any scripting based upon this.

You will be able to access the block-device-mapping by executing the following curl command:
curl http://192.0.0.192/1.0/meta-data/block-device-mapping

instance-id
The instance ID is the unique ID for your instance running in the Oracle Cloud. Exaample of an instance-ID is : /Compute-acme/joe.jonathan@example.com/debc974c-852e-4bd2-acd6-45a2de2109fd

You will be able to access the instance-id by executing the following curl command:
curl http://192.0.0.192/1.0/meta-data/instance-id

ami-launch-index
If you started more than one instance at the same time, this value indicates the order in which the instance was launched. The value of the first instance launched is 0. This is a feature from Amazon and is currently not supported within Oracle Cloud officially however; it will provide you a value back which can be used.

You will be able to access the ami-launch-index by executing the following curl command:
curl http://192.0.0.192/1.0/meta-data/ami-launch-index

instance-type
The instance-type will provide you information about the sizing of the machine. Memory and CPU resources available for the instance.

You will be able to access the instance-type by executing the following curl command:
curl http://192.0.0.192/1.0/meta-data/instance-type

kernel-id
Provides the ID of the kernel launched with this instance, if applicable. Officially not supported by Oracle and is a part of the Amazon compatibility. As it is not supported by Oracle it wise to not base any scripting based upon this.

You will be able to access the kernel-id by executing the following curl command:
curl http://192.0.0.192/1.0/meta-data/kernel-id

local-hostname
The local-hostname will provide the DNS name of the instance as it is used within the Oracle cloud.

You will be able to access the local-hostname by executing the following curl command:
curl http://192.0.0.192/1.0/meta-data/local-hostname

local-ipv4
The local-ipv4 will provide you the private IP address of the instance as it is used internally within the Oracle cloud.

You will be able to access the local-ipv4 by executing the following curl command:
curl http://192.0.0.192/1.0/meta-data/local-ipv4

placement
Placement will provide you the the Availability Zone in which the instance launched. Officially not supported by Oracle and is a part of the Amazon compatibility. As it is not supported by Oracle it wise to not base any scripting based upon this.

You will be able to access the placement by executing the following curl command:
curl http://192.0.0.192/1.0/meta-data/placement/availability-zone

product-codes
Product-codes provide you with the Product codes associated with the instance, if any. Officially not supported by Oracle and is a part of the Amazon compatibility. As it is not supported by Oracle it wise to not base any scripting based upon this.

You will be able to access the product-codes by executing the following curl command:
curl http://192.0.0.192/1.0/meta-data/product-codes

public-hostname
The public-hostname will provide the DNS name of the instance as it is used to face outwards of the Oracle Cloud

You will be able to access the public-hostname by executing the following curl command:
curl http://192.0.0.192/1.0/meta-data/public-hostname

public-ipv4
The public-ipv4 will provide you the public IP address of the instance as it is used to face outwards of the Oracle Cloud

You will be able to access the public-ipv4 by executing the following curl command:
curl http://192.0.0.192/1.0/meta-data/public-ipv4

public-keys
SSH public key specified while creating the instance, where{index} is a number starting with 0. public-keys/{index}/openssh-key

You will be able to access the public-keys by executing the following curl command:
curl http://192.0.0.192/1.0/meta-data/ public-keys/{index}/openssh-key

ramdisk-id
The ID of the RAM disk specified at launch time, if applicable. Officially not supported by Oracle and is a part of the Amazon compatibility. As it is not supported by Oracle it wise to not base any scripting based upon this.

You will be able to access the ramdisk-id by executing the following curl command:
curl http://192.0.0.192/1.0/meta-data/ placement/ ramdisk-id

reservation-id
The ID of the reservation. This is available from the Oracle REST API however Officially not supported by Oracle and is a part of the Amazon compatibility. As it is not supported by Oracle it wise to not base any scripting based upon this.

You will be able to access the ramdisk-id by executing the following curl command:
curl http://192.0.0.192/1.0/meta-data/ placement/reservation-id

security-groups
The names of the security groups applied to the instance. This is an Amazon feature and not available at the Oracle Cloud. Amazone uses it to ensure that after launch, you can only change the security groups of instances running in a VPC. Such changes are reflected here and in network/interfaces/macs/mac/security-groups.

You will be able to access the ramdisk-id by executing the following curl command:
curl http://192.0.0.192/1.0/meta-data/ placement/security-groups

Sunday, September 18, 2016

Oracle Cloud master orchestrations

When deploying a new instance in the Oracle Compute Cloud Service you will notice this is driven by an orchestration. If you look at the orchestration tab you will notice it is not a single orchestration, it will contain out of 3 orchestrations. One to bundle them and actually two orchestrations that will create a tangible object. In our case the tangible object will be an instance and a storage object.

  • Master orchestration which binds the two others together.
  • Instance orchestration which will create the actual compute instance.
  • Storage orchestration which will create the required storage volume. 
When working with orchestrations you have to remember that it is only the instruction set on how to create the actual end result. This means that, when you stop an orchestration the end result is not only stopped, it is also removed. When you start it again, the end result will be created again (from scratch).

In the below screenshot you can see 3 orchestrations which were used to create a compute instance named TESTBOX08 and the associated storage which was needed.


If we open the details of master orchestration we can see that this is actually a JSON file containing instructions on what to create.  In essence the master is used to bundle both the instance orchestration and the storage orchestration together and make it a single set of instructions.


As you can see in the above JSON used in the TESTBOX08_master orchestration there is a relationship defined in the master between TESTBOX08_storage and TESTBOX08_instance. The relationship is that you have a oplan named TESTBOX08_instance. This means that TESTBOX08_instance is the actual oplan, An object plan, or oplan, is the primary building block of an orchestration.

As you can see above and in the below example  this is how a  relationship within a oplan is defined.

{
 "oplan": ,
 "to_oplan": ,
 "type": "depends",
}

  • oplan : the name of oplan1 
  • to_oplan : Label of an oplan on which oplan1 depends
  • type: Type of the relationship. It must be depends

for this plan that means that the instance depends on the storage, that also means that the storage will be created first and after that the instance as soon as you execute the master orchestration.

Be careful when stopping the master orchestration
When selecting the “stop” command on the TESTBOX08_master orchestration you will get a warning which looks like this:

"Orchestration "TESTBOX08_master" will be stopped. Stopping an orchestration will destroy all objects that were created using the orchestration. If you created instances using this orchestration, those instances will be deleted. If you provisioned storage volumes using this orchestration, those storage volumes will be deleted and all data stored on them will be lost. However, objects created outside this orchestration and merely referenced in this orchestration won't be deleted. At any time, you can re-create objects defined in this orchestration by starting it. Are you sure you want to stop this orchestration?"


As you can see in the above screenshot when you stop the master orchestration it will take some time before the associated orchestrations are stopped. In the screenshot below you can see how all 3 orchestrations are topped.


As you can see in the above screenshot, also the storage has stopped and remembering the warning this would mean that also the attached storage is stopped, which means it is removed. If you check the storage tab you will see that indeed the storage volume is no longer available.

Now, if I select “start” again on the master orchestration it will start executing the storage and the instance orchestration again. It will first start the storage as this is a pre-requisition for the instance. The issue with this way of working, and the risk is, that you have to be aware that your storage is really been removed and is created again from scratch.

Meaning, you will have a fresh environment again, everything you have ever done to the system is lost. Which might be very well something you like to do… however, if you goal was to stop the instance for some period of time and start it again at a later moment and continue working on it again this is not the right direction. In that case, the case you would like to “pause” your instance you have to stop the instance orchestration only, which is described in more detail in this blogpost

Friday, September 16, 2016

Oracle ILOM V3.0 CLI

Whenever installing, racking and cabling, a new Oracle server the first thing you most likely want to have access too is the ILOM. ILOM, or Oracle Integrated Lights Out Manager. The current version of ILOM shipping with Oracle servers is version 3.0.

In the words of Oracle ILOM is; "Oracle’s Integrated Lights Out Manager (ILOM) provides advanced service processor hardware and software that you can use to manage and monitor your Oracle Sun servers. Oracle ILOM’s dedicated hardware and software is preinstalled on a variety of Oracle Sun server platforms, including x86-based Sun Fire servers, Sun Blade modular chassis systems, Sun Blade server modules, as well as on SPARC-based servers. Oracle ILOM is a vital management tool in the data center and can be used to integrate with other data center management tools already installed on your systems.

Oracle ILOM is supported on many Oracle systems enabling users to experience a single, consistent, and standards-based service processor (SP) across all Oracle Sun server product lines."

Most users will never have access to the ILOM and there is not a reason for it, it is primarily used by the department that is responsible for the hardware and up to a certain level the people responsible for the operating system.

Cabling up:
The first thing you will need to do when a new server is landing in your datacenter is ensuring it is racked and cabled. You will need power, the second important thing is to ensure your ILOM cabling is connected, after that (right after that) the networking cabling for the “standard” network and other cabling will be required.

The above diagram shows the backplane of a Oracle X6-2 server. When talking about the ILOM functionality the most important cabling option is shown in 9 in the diagram. Below is a full list of all cabling options of the X6-2.


  1. Power Supply (PS) 0
  2. Power Supply (PS) 0 status indicators: Service Required LED: amber AC OK LED: green
  3. Power Supply (PS) 1
  4. Power Supply (PS) 1 status indicators: Service Required LED: amber AC OK LED: green
  5. System status indicators: Locator LED: white; Service Required LED: amber; Power/OK LED: green
  6. PCIe card slot 1 (Nonfunctional in single-processor systems)
  7. PCIe card slot 2
  8. PCIe card slots 3 and 4
  9. Oracle Integrated Lights Out Manager (ILOM) service processor (SP) network management (NET MGT) 10/100/1000BASE-T port
  10. Serial management (SER MGT)/RJ-45 serial port
  11. Network (NET) 100/1000/10000 port: NET 3 (Nonfunctional in single-processor systems)
  12. Network (NET) 100/1000/10000 port: NET 2 (Nonfunctional in single-processor systems)
  13. Network (NET) 100/1000/10000 port: NET 1
  14. Network (NET) 100/1000/10000 port: NET 0
  15. USB 2.0 connectors (2)
  16. DB-15 video connector


One thing is important to remember is that the initial address for the ILOM is based upon DHCP enabled. This can, if you have not ensured you have a solution for this, make it hard to initially find the IP address assigned to your new server.

Connecting to the ILOM:
As soon as you have the server powered on and cabled you would like to have access to the ILOM. In essence you can access the ILOM in two ways. You will have a GUI interface which can be accessed by using a browser, you can however also connect to it using SSH as your connection method.

The beauty of using SSH is that it is giving you a lot more freedom on what you can do, however, this is a preference thing. SSH authentication can be done based upon the traditional username/password way of working, however, also a key-based authentication method is available.

Getting to know the ILOM CLI:
When connecting to the ILOM you can use a SSH session and you will be logging in as the user root to ILOM. This means you can use a command like shown below

ssh root@ip-address

This will bring you directly to the CLI from the ILO where you can start using the ILOM functionality. The first what you will be exposed to is the CLI shown below:

Oracle(R) Integrated Lights Out Manager

Version 3.0.0.0 r54408

Copyright (c) 2010, Oracle and/or its affiliates. All rights reserved.

->

Oracle ILOM 3.0 will have a number of namespaces as shown below. For most activities and the most commonly used will be the /SP namespace, this is used on every Oracle server and is available on each machine.

/SP namespace
The targets and properties below this target type are used on a Sun server for configuring the Oracle ILOM service processor (SP) and for viewing logs and consoles.

/CMM namespace
On blade chassis platforms, this target type replaces /SP and is used for configuring the Oracle ILOM chassis monitoring module (CMM).

/SYS namespace
The targets and properties below this target type are used on a Sun server to monitor inventory status and environmental sensors, as well as to manage service components. The targets under this target type directly correspond to the names of the hardware components, some of which are printed on the physical hardware.

/CH namespace
On blade chassis platforms, this target type replaces /SYS and provides inventory status, environmental status, and hardware management at the chassis level. The target types directly correspond to nomenclature names for all hardware components, some of which are printed onto the physical hardware.

/HOST namespace
The targets and properties below this target type are used on a Sun server
to monitor and manage the host operating system.

After logging into the ILOM CLI the basic commands you can use are shown below. You can use this to navigate through the namespace, edit, create and delete objects in the namespace.

  • cd Navigates the object namespace.
  • create Sets up an object in the namespace.
  • delete Removes an object from the namespace.
  • exit Terminates a CLI session.
  • help Displays Help information for commands and targets.
  • load Transfers a file from an indicated source to an indicated target.
  • dump Transfers a file from a target to a remote location specified by the URI.
  • reset Resets the state of the target.
  • set Sets target properties to the specified value.
  • show Displays information about targets and properties.
  • start Starts the target.
  • stop Stops the target.
  • version Displays the version of service processor running

When navigating in a namespace in the ILOM it might be hard to find your way around, especially as you are not working on it on a daily basis. The below diagram can help you navigate the /SP namespace. Having this diagram as a reference can help your enormously.

ILOM CLI examples:
As stated, the ILOM CLI can be used to navigate the namespace, edit, change or delete objects. The set of commands provided to you will allow you to do virtually everything you would like to do on an ILOM. Below are some examples of how the CLI would work while interacting with the ILOM.
We will use the example on doing some work on the HTTP service of the ILOM. The HTTP service is located in the namespace in /SP/services/http

Getting the current settings can be done by executing the show command:
show /SP/services/http

Change HTTP settings, such as enabling automatic redirection to HTTPS:
set /SP/services/http port=portnumber secureredirect=[enabled|disabled] servicestate=[enabled|disabled]

Conclusion:
The above examples show how you can quickly change the state of an object while using the CLI. Understanding the ILOM CLI when operating a large number of systems will help you largely in debugging issues and getting to a lower (and more direct) interaction level with your servers. Even though the ILOM can be accessed using a GUI via http it is good practice to ensure you also have a good understanding on how the CLI would work.

Oracle IaaS - Stop an instance

When working with the Oracle Compute Cloud Service, or IaaS, there are a couple of things to remember when you want to stop or delete a machine (instance). In essence you cannot stop or delete instance. Instances are seen as “temporary” results of the execution of a orchestration and not an object of itself.

The Oracle documentation explains this subject around an orchestration in the following wording:

When you start an orchestration, the objects defined in it are created, and when you stop an orchestration, those objects are deleted. However, stopping an orchestration doesn’t cause the orchestration itself to be deleted. After you stop an orchestration, the orchestration continues to be listed on the Orchestrations page, where its status is shown as Stopped. You can still start, view, or download the orchestration. When you delete an orchestration, however, it’s no longer listed on the Orchestrations page, and you can’t perform any action on it.

In previous releases of the Oracle Compute Cloud Service you could delete a instance. In the screenshot below you can see the option “delete” is still available. This will stay available for all machines created in previous releases. The reason for this is that for those machines no orchestration will be available on the orchestration tab.


For instances that have been created at later versions you will not find the delete button, you can simply not stop an instance, you will have to stop the orchestration instead. The successful execution of an orchestration results in an instance, this means that the orchestration is controlling all resulting products, in our case an IaaS instance.

If you have an instance running which is the result of executing the orchestration TESTBOX08_instance and you want to stop that resulting instance you will not have the option to stop the instance TESTBOX08. You will have the TESTBOX08_instance under your “Orchestration” tab in the Oracle cloud. You will however have the option to stop the TESTBOX08_instance orchestration.


After you have executed the stop command on the orchestration you will see that the options you have changed. You now have the option to resize and you have the option to delete the orchestration.


At the same time you will see that your instance is now also no longer available under your instance tab.

If you want to start, or rather create, your instance again you will have the option in your stopped orchestration to start it again. This will result in running the orchestration again and it will create your instance again.

Conclusion:
In case you want to stop and/or delete a running instance on the Oracle Compute Cloud Service you will not have the option to do so. You will have to understand the concept that an instance is the result of the execution of a orchestration and you will have to use the orchestration as the source of the instance to stop the resulting instance instead of going directly to the end product (the instance)

Oracle Developers Cloud and shadow IT

Generally in organizations developers are a group of people with very high technical skills on developing solutions / coding, architecture, infrastructure and networking. What do developers want; they want a fully self-service environment. In essence they do not want the bothered to much by all kinds of rules that hinder them in doing development work.

To make it more tangible, developers want to be able to quickly spin up a new environment, test a new concept, fail fast and try a new approach or solution direction in which they think might be right. In general this will require a solution in which you can quickly create a new environment as well as an environment that allows you to quickly deploy or clone a existing solution and build upon that. Cloud based solutions provide such a solution and that is why cloud based solutions find such a big adoption within enterprises.

Developers tend to more and more adopt agile ways of working and companies tend to move more and more to a DEVOPS kind of operational model. Both desire and require a fully flexible platform which allows developers as well as operations the option to work in an agile manner, having the option to adopt fail fast development ways of working is a big advantage for the end result.

Traditionally this results in shadow IT, developers getting a budget / credit card and start consuming cloud services to make this happen. In general this is not the best solution and a better approach is to ensure you provide the required tools and solutions to your development community.

If you look at the options provided by Oracle Cloud, the combination of Oracle Developer Cloud Service and Oracle Cloud services in general you can provide that solution to your development and DEVOPS community without risking creating a shadow IT organization. Oracle Cloud Services allow you to channel the direction of cloud your DEVOPS and developer community is heading into and ensure the right level of governance and security is in place.

Providing your development teams or your DEVOPS team with the Oracle Developer Cloud Service access can provide the ideal way of providing your teams with what they need and still maintain a level of control.


It provides a rich set of functions out of the box and provides the option to allow your developers to use the toolset of their choice.


As an example you can use Maven, Hudson or Ant if you like Use one of the tools your developers prefer with built-in integration; Eclipse, Netbeans, JDeveloper and have the freedom to host your source code on (for example) Git or Github.


Friday, September 09, 2016

Automate Oracle Linux security hardening

Security becomes more and more a topic that receives the level of attention it deserves. For long security has been a topic that has commonly been seen something that, the other department for sure is handling. More and more security is becoming engraned in every level of IT departments and business organizations.

Companies start to realize that security is a subject that should be the foundation of the enterprise architecture and not something you add on top at a later stage and you do just a bit. Architects, developers and administrators as well as business and IT management becomes aware that ensuring the right level of security is vital for surviving and crucial to ensure day to day operations are not hindered in any way or form.

When thinking about security most people think about firewalls, antivirus solutions and passwords… overlooked are commonly the security parts needed in the developed code, how to secure a database and ensuring the operating system used on your servers is configured in the most optimal and secure manner.

Operating system security
Operating systems, and Linux is not any different in that, are still too often installed in a next, next finish manner. Not looking at how you should secure your installation correctly. Ensuring you have the correct level of hardening on your Oracle Linux system is vital to ensure full end-to-end security of your IT footprint.

CIS Benchmark
Good documentation and guidance on how to do proper hardening of your Oracle Linux Operating system is provided by both Oracle and CIS. CIS provides a benchmark guideline on what needs to be in place to ensure a proper secured Oracle Linux installation. CIS Oracle Linux 7 Benchmark, provides prescriptive guidance for establishing a secure configuration posture for Oracle Linux version 7.0.

By default the installation Oracle provides is already secured up to a certain level without the need to undertake any specific actions. Ensuring the CIS benchmark guidelines are implemented will ensure an even higher level implementing security on your Oracle Linux system

Additionally, the CIS benchmark is a well respected and accepted hardening guideline. Implementing it and scoring the level of implementation will give you a good insight in how your hardening scores against industry standards.

Automate it all
With the changing IT world into a model where automation is being implemented as much as possible and providing end-users with a self-service options to request and provision new systems. Using automation can support in creating a more secure implementation of Oracle Linux operating systems.

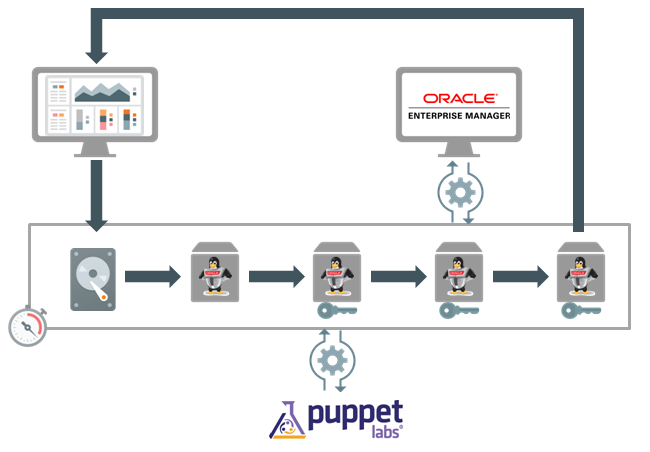
In the below shown flow you see how a new environment is requested, build and delivered to the requester for use. Requesting can be done, for example, via Oracle Enterprise Manager self service however, can also be done via the Oracle Cloud portal or any other form of self service portal.

In the above diagram the following steps are undertaken:

  1. The user requests a new system via a self service portal
  2. A standard golden machine image is used to build an Oracle Linux instance. 
  3. The resulting virtual machine is hardened by default and includes all standard hardening rules and settings as defined in the golden machine image.
  4. The new virtual machine registers itself with Puppet and Puppet will implement all additional security measures needed for a deployment to make it truly safe
  5. The new virtual machine registers itself with Oracle Enterprise Manager. Oracle Enterprise Manager will use the compliancy framework options to monitor and report on the level of compliancy against the security baseline defined. 
  6. The automation layer reports back to the user that the machine is ready for use. 


As you can see from the above steps, you can have a fully automated deployment which will ensure a fully secured and hardened Oracle Linux implementation is provided to the end users. At the same time the newly created machine is registered with Oracle Enterprise manager. Next to the well know use of Oracle Enterprise Manager to monitor performance and availability of a machine and do maintenance tasks it provides the option to use to compliancy framework. The compliancy framework within Oracle Enterprise Manager can be used in real-time to monitor the setting of the machine and benchmark them against a defined security standard. The benefit of this is that you can have a realtime insight in the level of implemented security over your entire IT footprint and produce compliancy reports and exception reports with the push of a button.

The use of Puppet is something seen more and more in environments that use a high level of automation. Puppet will be able to push configurations to all environments without the need to have human administrators taking the burden of doing manual tasks in the final configuration of machines. When building an automated deployment flow you do not want to include every setting in your golden machine image, the final configuration is something you would rather do with a solution like Puppet. Puppet is not alone in the market, other solutions are available such a Chef, Ansible and Salt however Puppet is currently the most commonly used solution.

Implementing a solution as shown above provides you a full end-to-end automation of new environments and at the same time makes the outcome of the process more predicatively and more secure.