Friday, December 31, 2010

Oracle VM invalid compressed data to inflate

Installing a Oracle VM template is a quite easy job, however, you might run into a unexpected error in some cases. My home test setup is that I have my Oracle VM running_pool and my seed_pool on a NFS server running Debian. I downloaded all the files needed for the installation of Oracle VM Template for Enterprise Manager Grid Control x86 (32 bit). If you look at the documentation on the Oracle website you have to simple unzip them, this is what the Oracle guide states:

# cd /OVS/seed_pool
# unzip V22875-01.zip
# unzip V22876-01.zip
# unzip V22879-01.zip
# unzip V22877-01.zip

In most cases this should work, the issue is that the zip files (the first 3 of them) contain files that are larger than 4 GB. the zip (or unzip in this case) algorithm is not very happy with files larger than 4 GB. You might encounter a issue like "error: invalid compressed data to inflate". I was under the impression something was not downloaded correctly so I downloaded it again however it gave me the same error and after checking the MD5 it was clear the files where not corrupted.

After some work on google I found a possible solution around this by using 7zip. however a more fine solution is also available without having to install another decompression tool.

This is also working (and more easy):

gunzip -c V22875-01.zip > OVM_EM_111_1of4.tgz
gunzip -c V22876-01.zip > OVM_EM_111_2of4.tgz
gunzip -c V22879-01.zip > OVM_EM_111_3of4.tgz
gunzip -c V22877-01.zip > OVM_EM_111_4of4.tgz

After this the manual continues and you have to execute the following command:

cat OVM_EM_111_?of4.tgz | tar -xzvf -

Now you will have a directory named OVM_EM_111 with your files in it which can be used to setup a new system from you Oracle VM Management console.

Thursday, December 30, 2010

import outlook pst on your mac

I recently started my 100% switch from a IBM Lenovo laptop from the company to a new macbook air. Using a macbook air (or a Linux distro) in a windows dominated corporate domain can be hard so I will share the upcoming time some tips and hints on how to switch and make your life more easy. When I received my macbook air I also received a Microsoft office 2011 suite which holds Microsoft outlook 2011 for mac.

One of the things I used to do, or not do, is delete e-mail. I do store almost all my send and received mail on my "previous" laptop in a local pst file. A pst file can be used on windows to store mail locally instead of on the mail server. So one of the things needed to do was to move my mail archive from my windows laptop to my macbook. A Personal Storage Table (.pst) is an open proprietary file format used to store copies of messages, calendar events, and other items within Microsoft software such as Microsoft Exchange Client, Windows Messaging, and Microsoft Outlook. The open format is controlled by Microsoft who provide free specifications and free irrevocable technology licensing.

A couple of simple steps to get this done. Uncheck the "Hide On My Computer folder" in your preferences menu;


Go to "File" and select "Import", in the next screen you have to select "Outlook Data file (.pst or .olm)";


On the next screen select that you want to import a .PST file;

After this select your .PST file you want to import and after selecting the file click "Import". This process can take some time depending on the size of the .PST file. After this is done you will be able to locate you local file in your left pane of your outlook.

Sunday, December 12, 2010

Linux find hardware

Ok lets say you get into a office from a customer and you have to familiarize yourself as quick as possible with what kind of systems the customer is running in its datacenter. You can do a lot by looking at the operating system however at some point you also want to know what kind of hardware is located in the datacenter, what hardware are those systems are running on. You can quickly see a lot of stuff like memory, CPU and storage however if you want to dive into more detail of the hardware you will find your friend in the lshw command.

lshw stands for list hardware and enables you to list all the hardware on your system. lshw comes in a commandline version and a graphical version. We will focus on the commandline version.

lshw has a couple of options, the first which we will not discuss is the -X command, this will launch the GUI of lshw which we will not discuss. What are great options when you need to index a lot of systems in a short time are the -xml and the -html command. The -html command will generate a very basic command which you could use to generate per server a hardware information page, if you want to do more than only view it and you want to import it in a database for example you can use the -xml option to generate the same content in a xml way.

The -short and -businfo options are more for when you need a quick glimps into the hardware. This is commonly used when you will be debugging some problem which might be related to hardware.

A example of the output of the lshw -short command on one of my laptops is shown below;


root@JOLO-LINUX:~# lshw -short
H/W path Device Class Description
==========================================================
system 6464B88
/0 bus 6464B88
/0/0 memory 128KiB BIOS
/0/6 processor Intel(R) Core(TM)2 Duo CPU T7100 @ 1.80GHz
/0/6/a memory 64KiB L1 cache
/0/6/c memory 2MiB L2 cache
/0/6/0.1 processor Logical CPU
/0/6/0.2 processor Logical CPU
/0/b memory 64KiB L1 cache
/0/2b memory 2GiB System Memory
/0/2b/0 memory 1GiB SODIMM DDR2 Synchronous 667 MHz (1.5 ns)
/0/2b/1 memory 1GiB SODIMM DDR2 Synchronous 667 MHz (1.5 ns)
/0/1 processor
/0/1/0.1 processor Logical CPU
/0/1/0.2 processor Logical CPU
/0/100 bridge Mobile PM965/GM965/GL960 Memory Controller Hub
/0/100/2 display Mobile GM965/GL960 Integrated Graphics Controller
/0/100/2.1 display Mobile GM965/GL960 Integrated Graphics Controller
/0/100/19 eth0 network 82566MM Gigabit Network Connection
/0/100/1a bus 82801H (ICH8 Family) USB UHCI Controller #4
/0/100/1a.1 bus 82801H (ICH8 Family) USB UHCI Controller #5
/0/100/1a.7 bus 82801H (ICH8 Family) USB2 EHCI Controller #2
/0/100/1b multimedia 82801H (ICH8 Family) HD Audio Controller
/0/100/1c bridge 82801H (ICH8 Family) PCI Express Port 1
/0/100/1c.1 bridge 82801H (ICH8 Family) PCI Express Port 2
/0/100/1c.1/0 wlan0 network PRO/Wireless 4965 AG or AGN [Kedron] Network Connection
/0/100/1c.2 bridge 82801H (ICH8 Family) PCI Express Port 3
/0/100/1c.3 bridge 82801H (ICH8 Family) PCI Express Port 4
/0/100/1c.4 bridge 82801H (ICH8 Family) PCI Express Port 5
/0/100/1d bus 82801H (ICH8 Family) USB UHCI Controller #1
/0/100/1d.1 bus 82801H (ICH8 Family) USB UHCI Controller #2
/0/100/1d.2 bus 82801H (ICH8 Family) USB UHCI Controller #3
/0/100/1d.7 bus 82801H (ICH8 Family) USB2 EHCI Controller #1
/0/100/1e bridge 82801 Mobile PCI Bridge
/0/100/1e/0 bridge RL5c476 II
/0/100/1e/0.1 bus R5C832 IEEE 1394 Controller
/0/100/1e/0.2 generic R5C822 SD/SDIO/MMC/MS/MSPro Host Adapter
/0/100/1e/0.3 generic Illegal Vendor ID
/0/100/1e/0.4 generic R5C592 Memory Stick Bus Host Adapter
/0/100/1e/0.5 generic xD-Picture Card Controller
/0/100/1f bridge 82801HBM (ICH8M-E) LPC Interface Controller
/0/100/1f.1 scsi0 storage 82801HBM/HEM (ICH8M/ICH8M-E) IDE Controller
/0/100/1f.1/0.0.0 /dev/cdrom disk DVD/CDRW UJDA775
/0/100/1f.2 scsi2 storage 82801HBM/HEM (ICH8M/ICH8M-E) SATA AHCI Controller
/0/100/1f.2/0.0.0 /dev/sda disk 100GB HITACHI HTS72201
/0/100/1f.2/0.0.0/1 /dev/sda1 volume 35GiB Windows NTFS volume
/0/100/1f.2/0.0.0/2 /dev/sda2 volume 41GiB Windows NTFS volume
/0/100/1f.2/0.0.0/3 /dev/sda3 volume 16GiB Extended partition
/0/100/1f.2/0.0.0/3/5 /dev/sda5 volume 15GiB Linux filesystem partition
/0/100/1f.2/0.0.0/3/6 /dev/sda6 volume 760MiB Linux swap / Solaris partition
/0/100/1f.3 bus 82801H (ICH8 Family) SMBus Controller
/1 power 92P1141
root@JOLO-LINUX:~#


the output of the lshw -businfo command on the same machine is shown below;


root@JOLO-LINUX:~# lshw -businfo
Bus info Device Class Description
=====================================================
system 6464B88
bus 6464B88
memory 128KiB BIOS
cpu@0 processor Intel(R) Core(TM)2 Duo CPU T7100 @ 1.80GHz
memory 64KiB L1 cache
memory 2MiB L2 cache
processor Logical CPU
memory 64KiB L1 cache
memory 2GiB System Memory
memory 1GiB SODIMM DDR2 Synchronous 667 MHz (1.5 ns)
cpu@1 processor
processor Logical CPU
pci@0000:00:00.0 bridge Mobile PM965/GM965/GL960 Memory Controller Hub
pci@0000:00:02.0 display Mobile GM965/GL960 Integrated Graphics Controller
pci@0000:00:02.1 display Mobile GM965/GL960 Integrated Graphics Controller
pci@0000:00:19.0 eth0 network 82566MM Gigabit Network Connection
pci@0000:00:1a.0 bus 82801H (ICH8 Family) USB UHCI Controller #4
pci@0000:00:1a.1 bus 82801H (ICH8 Family) USB UHCI Controller #5
pci@0000:00:1a.7 bus 82801H (ICH8 Family) USB2 EHCI Controller #2
pci@0000:00:1b.0 multimedia 82801H (ICH8 Family) HD Audio Controller
pci@0000:00:1c.0 bridge 82801H (ICH8 Family) PCI Express Port 1
pci@0000:00:1c.1 bridge 82801H (ICH8 Family) PCI Express Port 2
pci@0000:03:00.0 wlan0 network PRO/Wireless 4965 AG or AGN [Kedron] Network Connection
pci@0000:00:1c.2 bridge 82801H (ICH8 Family) PCI Express Port 3
pci@0000:00:1c.3 bridge 82801H (ICH8 Family) PCI Express Port 4
pci@0000:00:1c.4 bridge 82801H (ICH8 Family) PCI Express Port 5
pci@0000:00:1d.0 bus 82801H (ICH8 Family) USB UHCI Controller #1
pci@0000:00:1d.1 bus 82801H (ICH8 Family) USB UHCI Controller #2
pci@0000:00:1d.2 bus 82801H (ICH8 Family) USB UHCI Controller #3
pci@0000:00:1d.7 bus 82801H (ICH8 Family) USB2 EHCI Controller #1
pci@0000:00:1e.0 bridge 82801 Mobile PCI Bridge
pci@0000:15:00.0 bridge RL5c476 II
pci@0000:15:00.1 bus R5C832 IEEE 1394 Controller
pci@0000:15:00.2 generic R5C822 SD/SDIO/MMC/MS/MSPro Host Adapter
pci@0000:15:00.3 generic Illegal Vendor ID
pci@0000:15:00.4 generic R5C592 Memory Stick Bus Host Adapter
pci@0000:15:00.5 generic xD-Picture Card Controller
pci@0000:00:1f.0 bridge 82801HBM (ICH8M-E) LPC Interface Controller
pci@0000:00:1f.1 scsi0 storage 82801HBM/HEM (ICH8M/ICH8M-E) IDE Controller
scsi@0:0.0.0 /dev/cdrom disk DVD/CDRW UJDA775
pci@0000:00:1f.2 scsi2 storage 82801HBM/HEM (ICH8M/ICH8M-E) SATA AHCI Controller
scsi@2:0.0.0 /dev/sda disk 100GB HITACHI HTS72201
scsi@2:0.0.0,1 /dev/sda1 volume 35GiB Windows NTFS volume
scsi@2:0.0.0,2 /dev/sda2 volume 41GiB Windows NTFS volume
scsi@2:0.0.0,3 /dev/sda3 volume 16GiB Extended partition
/dev/sda5 volume 15GiB Linux filesystem partition
/dev/sda6 volume 760MiB Linux swap / Solaris partition
pci@0000:00:1f.3 bus 82801H (ICH8 Family) SMBus Controller
power 92P1141
root@JOLO-LINUX:~#


you can use the lshw command itself without any extra option, this will show you a lot of information however that can be a little intimidating the first time you have a look at it. Better is to limit the output by using a class option. for example using the class option processor. Shown below is the output of the command lshw -class processor ;


root@JOLO-LINUX:~# lshw -class processor
*-cpu:0
description: CPU
product: Intel(R) Core(TM)2 Duo CPU T7100 @ 1.80GHz
vendor: Intel Corp.
physical id: 6
bus info: cpu@0
version: 6.15.13
serial: 0000-06FD-0000-0000-0000-0000
slot: None
size: 1801MHz
capacity: 1801MHz
width: 64 bits
clock: 200MHz
capabilities: boot fpu fpu_exception wp vme de pse tsc msr pae mce cx8 apic mtrr pge mca cmov pat pse36 clflush dts acpi mmx fxsr sse sse2 ss ht tm pbe nx x86-64 constant_tsc arch_perfmon pebs bts aperfmperf pni dtes64 monitor ds_cpl vmx est tm2 ssse3 cx16 xtpr pdcm lahf_lm ida tpr_shadow vnmi flexpriority cpufreq
configuration: id=0
*-logicalcpu:0
description: Logical CPU
physical id: 0.1
width: 64 bits
capabilities: logical
*-logicalcpu:1
description: Logical CPU
physical id: 0.2
width: 64 bits
capabilities: logical
*-cpu:1
physical id: 1
bus info: cpu@1
version: 6.15.13
serial: 0000-06FD-0000-0000-0000-0000
size: 800MHz
capacity: 800MHz
capabilities: vmx ht cpufreq
configuration: id=0
*-logicalcpu:0
description: Logical CPU
physical id: 0.1
capabilities: logical
*-logicalcpu:1
description: Logical CPU
physical id: 0.2
capabilities: logical
root@JOLO-LINUX:~#


the class option can be used also on the other commands, below example is the -class option used on the -short option;


root@JOLO-LINUX:~# lshw -short -class processor
H/W path Device Class Description
==========================================================
/0/6 processor Intel(R) Core(TM)2 Duo CPU T7100 @ 1.80GHz
/0/6/0.1 processor Logical CPU
/0/6/0.2 processor Logical CPU
/0/1 processor
/0/1/0.1 processor Logical CPU
/0/1/0.2 processor Logical CPU
root@JOLO-LINUX:~#


shown below is the class option used on the -businfo option.


root@JOLO-LINUX:~# lshw -businfo -class processor
Bus info Device Class Description
=====================================================
cpu@0 processor Intel(R) Core(TM)2 Duo CPU T7100 @ 1.80GHz
processor Logical CPU
cpu@1 processor
processor Logical CPU
root@JOLO-LINUX:~#


Sunday, December 05, 2010

oracle VM console

When you are using Oracle VM you might sometimes want to jump to the console of one of your virtual machines. You can connect to it using a new SSH session however in some cases it is more easy to connect directly to the console. For this you can use the console option from the XM command.

To be able to use it you first need to know which domain id the virtual machine has you want to connect to. You can use a xm list command for this, the example below is the output of one of my test servers;

[root@vms0 ~]# xm list
Name ID Mem VCPUs State Time(s)
34_jlo1 1 1024 1 -b---- 904.3
39_webcenter0 2 2048 2 -b---- 2742.7
Domain-0 0 574 4 r----- 52882.8
[root@vms0 ~]#

if I want to connect to "39_webcenter0" I will have to use ID 2 meaning my command will be "xm console 2". when you enter this command it will possibly looks like nothing is happening. However if you press enter you will get the login prompt of your console.

[root@vms0 ~]# xm console 2

Enterprise Linux Enterprise Linux AS release 4 (October Update 5)
Kernel 2.6.9-55.0.12.9.1.ELxenU on an i686

webcenter0 login:

Now you will be able to login to your system. One tricky part is how to exit the console again. When you are done you type the exit command and you will again come to the login prompt of your virtual machine. So you are still in the console. The way to exit the console (using putty) is Cntrl + ] and you will again be at the commandline of your Oracle VM server.

Reset Oracle OC4JADMIN password

When working with Oracle middleware you will have to use the OC4JADMIN account at some point. As it is with all username password combinations it can happen that you forget this password. For example you lost it, can not remember it, you get a system that is installed by someone else and you do not have the password. The options why you do not have this password are endless..... reseting the password can be done however not via a simple command. You will need to undertake some steps. This is not a bad thing because in a normal situation you will have the password, however in cases you do not have it you can take the following steps:

1) Login to a shell account on your server (we do only explain UNIX/Linux installs) and go stop your middleware services with "opmnctl stopall".

2) Go to $ORACLE_HOME/j2ee/home/config and open the file system-jazn-data.xml with vi

3) Locate the XML User structure for oc4jadmin

4) Delete the data between the "credentials" tags and enter here a new password with a "!" in front if it. The exclamation mark is important to indeicat that this is the new password.

5) Go to $ORACLE_HOME/j2ee/oc4jinstance/persistence/ascontrol/ascontrol/securestore and delete all file's. This is the location where the cached password are saved so we have to delete them.

6) start your middelware again with a opmnctl command

You are done and ready to go with the new password.

Wednesday, November 03, 2010

wget files from Oracle edelivery

When you want to install software from Oracle you have the great option you can download all you need from the edelivery website. The issue is that most of the files are quite large and in some cases we are talking about a large amount of very large files.

You can download all the files you need and after you downloaded it transfer it to your target server. However this means that your workstation is busy downloading files while you have your target server sitting idle. If you are in the lucky position that you can create a connection to the internet from your server you can download the files by making use of the wget command. The best option is to run the wget command in the background so you can end your connection and go ahead while your server is downloading the files. We assume that you have a linux server with only a commandline, if you are familiar with the download site from Oracle you know that you have to enter some credentials.

Your information is stored in a cookie on your workstation, so you have to move this cookie information to your server, in our case we have uploaded it to the file cookies.txt in the home of the root user. From the edelivery website we get the URL and we have to modify the URL a bit. In the URL we have some '&' signs which have to be changed to '\&'.

the wget command will become something like the example below:
wget --load-cookies /root/cookies.txt -O V14041-01_1of2.zip -bqc http://edelivery.oracle.com/EPD/Download/process_download/V14041-01_1of2.zip?file_id=25145149&aru=10526712&userid=131832&egroup_aru_number=10545708&email=john.do@oracle.com&country_id=528&patch_file=V14041-01_1of2.zip


--load-cookies /root/cookies.txt will state to load a cookie file from the stated location.

-O V14041-01_1of2.zip states the name the file will have to get when it is downloaded.

-bqc states that it will have to run in the background (b), no wget output (q) and it will resume a download if it gets broken (c).

This will make sure that the download will run in the background and you can work on other things while the download is running.

Monday, November 01, 2010

Oracle VM setup console

when you are running virtual machines in Oracle VM you might want to make use of the option to use the console button in the Oracle VM manager. The Oracle VM manager will open a popup screen which will load a console for you. This is however if it works. A lot of issues are known to get it running. The only thing is that you need to do take some simpel steps to get it running correct.

First login to the host where you run the Oracle VM Manager and check if you have installed the tightvnc-java rpm. If not download it from oss.oracle.com.

Second step is to install on your client the ovm-console rpm which can be downloaded from the same location. This will install a plugin in your firefox plugin location. The only thing you have to do is to execute a rpm -ivh (filename.rpm) and you are ready to go. Quite simple, however, if you are running a not so standard installation of Firefox or if you are running it on for example a Mac you might need to do some other steps. For a not standard install on Linux you might need to do the following:

Step one is to install the rpm:
# rpm -ivh ovm-console-version.rpm

second step is to do some copy commands:

# cp /opt/ovm-console/etc/mozpluggerrc /etc/
# cp /opt/ovm-console/bin/* /usr/bin
# cp /opt/ovm-console/lib/mozilla/plugins/ovm-console-mozplugger.so /opt/firefox/plugins
This is however for a Linux setup, when you run it on a mac you might want to do some other things.
1. Make sure you have installed RPM-For-MacOS which can be downloaded from rpm4darwin.sourceforge.net

2. initiate the RPM database by using "rpm --initdb"

3. install the RPM "rpm -ivh ovm-console-1.0.0-2.i386.rpm". This might end into a error as shown below:

Preparing... ########################################### [100%]
1:ovm-console ########################################### [100%]
ln: /usr/lib/mozilla/plugins/ovm-console-mozplugger.so: No such file or directory
error: %post(ovm-console-1.0.0-2.i386) scriptlet failed, exit status 1

4. Now we have to do some copy actions which are a little different from what needs to be done on Linux:

# cp /opt/ovm-console/etc/mozpluggerrc /etc/
# cp /opt/ovm-console/bin/* /usr/bin
# cp /opt/ovm-console/lib/mozilla/plugins/ovm-console-mozplugger.so /Applications/Firefox.app/Contents/Plug-Ins
This should solve most of the issues of a console that is not starting on a Linux or MacOS system.

Friday, October 29, 2010

hpvmmodify dynamic_memory_control

Currently one of the system under my maintenance is a HPUX system running two virtual machines on top of the host HPUX system. The system is currently in use a project environment and a sandbox. Due to a setup request for a Oracle product we needed to switch some of the memory from one virtual machine to the other virtual machine. Due to the fact that HPUX is not our core expertise some investigation was needed before this trick was done. Please find some pointers below to administer the memory of HPUX virtual machines.

Under /opt/hpvm/bin you can find some tools which can be used to administer your virtual machines. The first thing you most likely will be using when you are for the first time on a system and want to check the HPUX vm's is the hpvmstatus command. This will display the status information about one or more virtual machines. The below example is the hpvmstatus command used on my machine.


rx90135:root-/opt/hpvm/bin # hpvmstatus
[Virtual Machines]
Virtual Machine Name VM # OS Type State #VCPUs #Devs #Nets Memory Runsysid
==================== ===== ======= ========= ====== ===== ===== ======= ========
vm-db 1 HPUX On (OS) 4 2 2 4 GB 0
vm-ap1 2 HPUX On (OS) 4 3 2 6 GB 0

This shows you the current virtual machines and what has been allocated to them. In our case the vm-db has 4GB memory and the vm-ap has 6GB memory. For our new setup we needed to switch those. This can be done in basic with the following commands:


hpvmmodify -P vm-db -r 6g -x dynamic_memory_control=1
hpvmmodify -P vm-ap1 -r 4g -x dynamic_memory_control=1


Some other things are their to be noted. For example did you install the guest additions. You can check this on the clients (virtual machines) with the swlist command as shown below:


hpvm13:root-/ # swlist HPVM-Guest
# Initializing...
# Contacting target "hpvm13"...
#
# Target: hpvm13:/
#

# HPVM-Guest A.03.00.01 Integrity VM Guest
HPVM-Guest.vmTools A.03.00.01 Integrity VM Tools
hpvm13:root-/ #


A great blogpost on HPVM memory is the website from Juan Manuel. If you start working with this technology this is a mus read weblog.

Monday, October 25, 2010

Oracle VM Agent

When you install a Oracle VM server this is only a single part of your infrastructure. You can potentially run only the Oracle VM server however if you want to make use of the options provided by a central Oracle VM Manager you will have to make sure that your Oracle VM server will be able to communicate with this centralized server.

The mechanism to do this is a Oracle VM Agent which runs on the Oracle VM server and will make sure that you can control this from your central Oracle Management Server. During the installation of the Oracle VM Server you can set the password for your Oracle VM Agent. (see below)

If you want to control your VM agent after installing it you can make use of the ovs-agent command. This can be found as a script in /etc/init.d or you can make use of the "service ovs-agent" option.

Besides the standard things you might expect from a script in /etc/init.d like stop, start, restart and status you also have the option configure. when you use the configure option you can reconfigure things like your VM agent password, IP configuration and such. A example can be seen below:


[root@vms0 init.d]# ./ovs-agent configure
;network access control by ip --
;rules := if addr.match(allow) and not addr.match(deny): return True
;pattern items delimited by comma and could be
;219.142.73.50 #single ip
;219.142.73.* #range
;219.142.73.0/24 #range in CIDR format
;default to allow all, deny none
allow=*
allow=
now allow=*

deny=
deny=
now deny=

;share_disk_pat --
;set the directories for searching sharable block devices
;directories should be seperated by ':'
;if not set, /dev/mpath/* will be used
share_disk_pat=/dev/mpath/*
share_disk_pat=
now share_disk_pat=/dev/mpath/*

disk.sparse.ratio=0.25
disk.sparse.ratio=
now disk.sparse.ratio=0.25

would you like to modify password to communicate with agent (local)?[y/N]

OVS Agent configuration done.

Tell agent to reload cache ...
Agent cache reloaded.
[root@vms0 init.d]#


when you use the option status you can see what is running when you use ovs-agent


[root@vms0 init.d]# ./ovs-agent status
ok! process OVSLogServer exists.
ok! process OVSMonitorServer exists.
ok! process OVSAgentServer exists.
ok! process OVSPolicyServer exists.
ok! process OVSRemasterServer exists.
ok! OVSAgentServer is alive.
[root@vms0 init.d]#

Oracle VM and SATA

I recently picked up again on Oracle VM. Some years ago I have been working on Oracle VM and now a new project is coming up which will involve a lot of virtualization with Oracle VM.

Due to the fact I would love to play with it at home I purchased some new hardware to build my own Oracle VM instance. Issue is that Oracle VM is build for high end enterprise solutions and the drivers which are compiled into the kernel do contain almost only high end enterprise drivers. As it turns out the SATA drivers for my Asus board where not included.

The issue arrises when you try to install the Oracle VM server. The moment you need to select a media to install the Oracle VM on the installer is not showing you your SATA disks. The solution was quite simple, at least on my mainboard which is a ASUS P7P55D-E. When you enter the BIOS you set your SATA disks on AHCI instead of SATA (or RAID). After you set this and reboot the machine the Oracle VM installer will be able to find your drives. Reason for this is that AHCI drivers are in the main kernel of Oracle VM server (version 2.2.1).

The Advanced Host Controller Interface (AHCI) is a host controller interface defined by Intel which defines the operation of Serial ATA (SATA) host bus adapters in a non-implementation-specific manner. The specification describes a system memory structure for computer hardware vendors to exchange data between host system memory and attached storage devices. As of June 2008[update], the current version of the specification is v. 1.3. AHCI gives software developers and hardware designers a standard method for detecting, configuring, and programming SATA/AHCI adapters. AHCI is separate from the SATA 3Gb/s standard, although it exposes SATA's advanced capabilities (such as hot-plugging and native command queuing) such that host systems can utilize them.

Saturday, September 25, 2010

Oracle Promotional goods

When you run your sales in Oracle E-Business suite you want from time to time run promotions. For example if you sell an item in Oracle Order Management you want to “give” the customer a second item for free, a promotional item.

This is common practice in a lot of businesses and especially in B2C businesses that you get a second item for free if you buy a special product. Oracle is providing you will all the options needed to arrange this inside Oracle e-Business Suite.

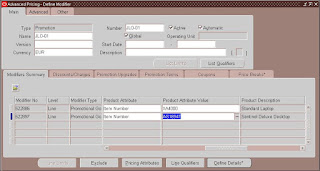
For example, if you sell a laptop you want to add an extra battery pack as a promotional item. You can arrange this by using Oracle Advanced Pricing and create a Modifier of the type “Promotion”. As can be seen below we create a modifier named JLO-01.

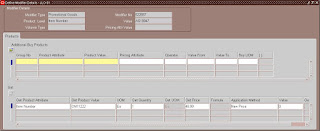
Inside the modifier we have created a line for item AS18947. This is a laptop and we want to give a promotion of a second item for every customer who buys this item. If you click the “Define Details” button you will be able to set the item that the customer will “get”. You have to make sure you define it as a “get”item.

You can see that we have stated here a get item for item CM11222 and we have stated the “Application Methode” is “New Price”. This will make sure that the price of the get item will be overwritten by the value defined in the “value” field which is in this case zero. Meaning this item will be for free if the customer buys your item AS18947.

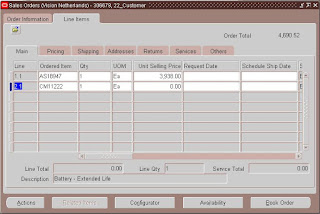
If we now add the item to an order we will see something nice happening. We use Oracle Order Management to create a new order. If we add the line and we are done you will notice a message popping up stating that a second line is created.

You can see in the below example that indeed a new line has been added for item CM11222 for the quantity 1 and the price 0. This is what we intended when we created the modifier JLO-01. If you check via actions > “View Adjustments” you will also notice that a adjustment to the order is done by modifier JLO-01


Tuesday, September 21, 2010

Linux mount USB

USB disks are used more and more and almost nobody thinks about how a USB drive is attached to the computer. You plugin your disk and it works. When you are done you get your drive and move on. When using windows or most of the Linux GUI driven systems there is nothing to think about. However, if you run a couple of commandline only Linux systems you have to do more than only plugin your USB cable. However, it is not very hard to do this from a Linux shell in a manual way. Basicly it is the same as mounting a new drive or network drive on your system.

The trick is to find out where the drive is mounted under /dev and then mount it at a location on your system by using the standard commands you are used to.

When you attache your USb drive to the system it can be good to have a tail -f running on your /var/log/messsages. You will find a message somthing like the one below when you attache your drive.


Sep 16 17:26:09 homebox00 kernel: [2063013.339435] usb 4-1: new high speed USB device using ehci_hcd and address 4
Sep 16 17:26:10 homebox00 kernel: [2063013.472602] usb 4-1: configuration #1 chosen from 1 choice
Sep 16 17:26:10 homebox00 kernel: [2063013.476190] scsi4 : SCSI emulation for USB Mass Storage devices
Sep 16 17:26:10 homebox00 kernel: [2063013.477177] usb 4-1: New USB device found, idVendor=1058, idProduct=1001
Sep 16 17:26:10 homebox00 kernel: [2063013.477849] usb 4-1: New USB device strings: Mfr=1, Product=2, SerialNumber=3
Sep 16 17:26:10 homebox00 kernel: [2063013.478958] usb 4-1: Product: External HDD
Sep 16 17:26:10 homebox00 kernel: [2063013.479588] usb 4-1: Manufacturer: Western Digital
Sep 16 17:26:10 homebox00 kernel: [2063013.480205] usb 4-1: SerialNumber: 574341553433383836343732
Sep 16 17:26:15 homebox00 kernel: [2063018.486535] scsi 4:0:0:0: Direct-Access WD 10EAVS External 1.05 PQ: 0 ANSI: 4
Sep 16 17:26:15 homebox00 kernel: [2063018.504738] sd 4:0:0:0: [sda] 1953525168 512-byte hardware sectors (1000205 MB)
Sep 16 17:26:15 homebox00 kernel: [2063018.506813] sd 4:0:0:0: [sda] Write Protect is off
Sep 16 17:26:15 homebox00 kernel: [2063018.509230] sd 4:0:0:0: [sda] 1953525168 512-byte hardware sectors (1000205 MB)
Sep 16 17:26:15 homebox00 kernel: [2063018.511297] sd 4:0:0:0: [sda] Write Protect is off
Sep 16 17:26:15 homebox00 kernel: [2063018.512656] sda: unknown partition table
Sep 16 17:26:15 homebox00 kernel: [2063018.518501] sd 4:0:0:0: [sda] Attached SCSI disk


From this you can see that the new drive is at /dev/sda . At the system I am attaching this drive I have a directory at /storage/disk0 and I will use this location to mount the USB drive.

You can now simply use the below command:
mount /dev/sda /storage/disk0

If you do a df -h you will see the new drive attached to your /storage/disk0 location. This can be any other location you want.


Thursday, September 09, 2010

Oracle EBS mass create users

When using Oracle e-Business suite in a production environment you most likely will have besides a production instance some other instances. For example you might have an instance for developers and a Oracle eBS instance for your support organization. In most cases developers and possibly people from the support organization do not have an account on eBS.

In those cases you would like to have those accounts generated every time a instance is refreshed from a production instance. You can decide to have your developers do this manually as they most likely will have a high level of database access however it is more convenient to incorporate the generation of accounts into your cloning scripting.

The below script can be used to do this. It can also be used to generate for example user accounts on a production environment in case you need to do a mass creation of users. It is however advisable to change the script a bit if you intend to use it for this purpose. For cloning it is very useful.


/*********************************************************************************/
/*    after_clone_user_create_ebs.sql                                            */
/*                                                                               */
/*    PL/SQL script to create mass users for Oracle EBS non production instances */
/*    after a refresh from production. Developers and such can be added by this  */
/*    script.This code is tested on Oracle EBS 11.5.10.2 systems                 */
/*                                                                               */
/*    Copyright (C) 2010  Johan Louwers                                          */
/*                                                                               */
/*    This program is free software: you can redistribute it and/or modify       */
/*    it under the terms of the GNU General Public License as published by       */
/*    the Free Software Foundation, either version 3 of the License              */
/*                                                                               */
/*    This program is distributed in the hope that it will be useful,            */
/*    but WITHOUT ANY WARRANTY; without even the implied warranty of             */
/*    MERCHANTABILITY or FITNESS FOR A PARTICULAR PURPOSE.  See the              */
/*    GNU General Public License for more details.                               */
/*                                                                               */
/*    You should have received a copy of the GNU General Public License          */
/*    along with this program.  If not, see http://www.gnu.org/licenses.         */
/*                                                                               */
/*    CONTRIBUTIONS                                                              */
/*    JLO          Johan.Louwers{at}capgemini.com                                */
/*                                                                               */
/*                                                                               */
/*    VERISON    DATE         DEVELOPER   DESC                                   */
/*    1.0        28-AUG-2010  JLO         Initial creation                       */
/*    1.1        29-AUG-2010  JLO         Added logging to the output.           */
/*                                                                               */
/*                                                                               */
/*********************************************************************************/

Set serveroutput ON;

DECLARE
/*--------------------------------------------*/
/* declare all the variables used in the      */
/* script.                                    */
/*                                            */
/*                                            */
/*--------------------------------------------*/
createdUser varchar2(200);
TYPE t_users IS VARRAY(60) OF VARCHAR2(20);
TYPE t_resp IS VARRAY(60) OF VARCHAR2(50);   


/*--------------------------------------------*/
/* State the usernames which have to be       */
/* created by the program. If the name is     */
/* already in the system it will not be       */
/* created again.                             */
/*--------------------------------------------*/
t_list_users t_users := t_users('SOMEUSERNAME'
,'ANOTHERUSERNAME'
,'SOMEUSER'
);


/*--------------------------------------------*/
/* list the resps that will be added to each  */
/* new user. The values are based upon the    */
/* value of RESPONSIBILITY_KEY as stated in   */
/* FND_RESPONSIBILITY. If the KEY is not      */
/* valid a error will be thrown               */
/*--------------------------------------------*/                                      
t_list_resp t_resp := t_resp('SYSTEM_ADMINISTRATOR'
,'APPLICATION_DEVELOPER'
);    


/*--------------------------------------------*/
/* cursor c_user_exists will be used to check */
/* if the user is already in the system. This */
/* is to prevent a error from happening by    */
/* entering a user for the second time which  */
/* is not allowed by fnd_user_pkg.CreateUser  */
/*--------------------------------------------*/ 
CURSOR c_user_exists (p_username IN VARCHAR2) IS
SELECT 
COUNT (us.user_name) AS usercounter
FROM 
apps.fnd_user us
WHERE 
us.user_name = (p_username);
r_user_exists c_user_exists%rowtype; 


/*--------------------------------------------*/
/* cursor c_resp_details will be query all    */ 
/* details for a resp needed when adding it to*/
/* a new user.                                */
/*                                            */  
/*--------------------------------------------*/
CURSOR c_resp_details (p_respkey IN VARCHAR2) IS
SELECT   
fav.application_short_name
,fav.application_name
,frv.responsibility_key
,frv.responsibility_name
FROM 
fnd_application_vl fav
,fnd_responsibility_vl frv
WHERE 
frv.application_id = fav.application_id
AND frv.responsibility_key = (p_respkey);
r_resp_details c_resp_details%rowtype; 


BEGIN
FOR i IN t_list_users.FIRST .. t_list_users.LAST
LOOP

DBMS_OUTPUT.PUT_LINE(' ');
DBMS_OUTPUT.PUT_LINE('+ Checking for user '||t_list_users(i));

/*--------------------------------------------*/
/* Check if the user is already in the system */ 
/* if this is the case we will not create we  */
/* will only print a warning to the screen    */
/*                                            */  
/*--------------------------------------------*/
open c_user_exists(t_list_users(i));
fetch c_user_exists into r_user_exists;

IF r_user_exists.usercounter > 0
THEN
DBMS_OUTPUT.PUT_LINE(' - User '||t_list_users(i)||' was found, we will not create it. ');

/*--------------------------------------------*/
/* If the user in not the system we will have */ 
/* to create the user and print this to the   */
/* output. Creation will be done by using the */
/* standard fnd_user_pkg.CreateUser option    */  
/*--------------------------------------------*/
ELSE
DBMS_OUTPUT.PUT_LINE(' - User '||t_list_users(i)||' was NOT found, we will create it again');

createdUser := t_list_users(i);

fnd_user_pkg.CreateUser(x_user_name            => t_list_users(i)
,x_owner                => 'CUST'
,x_unencrypted_password => 'welcome'
,x_description => 'External Consultant'
);

/*--------------------------------------------*/
/* For all new users we will add all the resps*/ 
/* which have been stated in t_list_resp. To  */
/* be able to get all the details needed by   */
/* fnd_user_pkg.AddResp we will query it via  */
/* cursor c_resp_details.                     */
/*--------------------------------------------*/       
FOR i IN t_list_resp.FIRST .. t_list_resp.LAST
LOOP
DBMS_OUTPUT.PUT_LINE(' - Adding to user '||createdUser||' the resp '||t_list_resp(i)||'.');
open c_resp_details(t_list_resp(i));
fetch c_resp_details into r_resp_details;

fnd_user_pkg.AddResp(username       => createdUser
,resp_app       => r_resp_details.application_short_name
,resp_key       => t_list_resp(i)
,security_group => 'STANDARD'
,description    => r_resp_details.responsibility_name
,start_date     => SYSDATE
,end_date       => NULL
);
close c_resp_details;
END LOOP;
END IF;
close c_user_exists;     


END LOOP;  

END;

COMMIT;

Monday, August 09, 2010

Linux count lines in file

In some cases you want to find out the number of lines and or words in a document. In my case I do sometimes need to know the number of lines in a file (or datastream). This can be handy when you do some research on log files for example.

Linux is providing a great standard command for this called wc which stands for Word Count.

As an example you can do count of lines with wc on your apache access log with the following command:
wc -l access.log

Which will result in the following: "479 access.log"

Several options are provided:
-c will print the byte count
-m will print the character count
-l will print the lines counted
-w will print the words in the file

The man file of wc will give you some more options that can be usefull. Not only you can use it directly on a file you can also pipe data to it. For example if I would like to know how maney times a certain IP address is logged in my apache log file I could do the following:

to get the data we do a:
cat access.log

we do however want to filter the result to only lines having the IP 83.81.217.8 so we pipe the result from cat to a grep command:

cat access.log | grep 83.81.217.8

This however will provide us a list instead of a number of lines, to do this we can use wc -l . We pipe the result of the previous command to it and we end up with the following line:

cat access.log | grep 83.81.217.8 | wc -l

This will provide ONLY the number of lines as a result. Now the example of counting the lines in my access.log file is only a simple example. The number of options and ways you can use wc is endless.

Friday, July 23, 2010

Oracle forms not starting with JRE and IE8


Most likely a hot debated topic at the sites of many Oracle EBS customers is the question if they would like to stay on Oracle jInitiator or to make the switch to the JRE approach.

Oracle E-Business Suite makes use of Oracle forms which is a Java application for witch you have to load some .jar files onto your local browser who will take the client software role. Oracle always used jInitiator for this which used to do this task. Recently Oracle made a switch to a new approach and started to advocate the use of Sun Java Runtime Environment or JRE for short.

This also makes it possible to start your forms part of Oracle E-Business suite from Internet Explorer 8 for example and other browsers like FireFox. This was possible in the past however would take some hacking from the users who wanted this to happen. As most customers are upgrading their workstations and browsers to a newer versions it is feasible to go for the JRE option.

The following things need to happen:

(A) You have to apply patches on your server and make it ready for JRE.
In this case you should review metalink note 290807.1 which informs you about all the steps needed to take to make this happen on the server side.

(B) you have to make sure the correct version of JRE is installed on (or gets installed) on your clients.

Due to some bugs it is very important to look for which version is the best at the moment you start this project. My best advice would be to keep an eye on the weblog of Steven Chan for this subject and start a service request at metalink before you make a decision.

Even if you have taken all the steps to make sure all should work fine you can run into problems with some clients which for some reason will refuse to start a new forms session. I recently had this issue at a client and it later turned out to be a networking/firewall/proxy issue. The best way to start debugging in those cases is the logging in JRE which is not very known to many people.

Open the Java Control Panel and go to the advanced tab. Here can activate tracing and logging. When you have activated those try to start a forms session again and review the log and trace file.

The resulting files can be found at "\Sun\Java\Deployment\log" and do contain a lot of useful information for you debugging. I would like to advise to always do a trace/log first on the client in cases you have problems on a client starting the forms session with JRE instead of Oracle jInitiator.

Oracle VM presentation


Just in case you missed (somehow) the fact that Oracle is having a stack of virtualization software you might have a look at the link below to the flash demo of Oracle VM.

Oracle VM is a server virtualization solution, this is different from for example a virtualbox installation where you run the virtualization software on your host Operating System and inside this software you run a virtual machine.

The Oracle VM solution is build upon the technology from the opensource project Xen in which Oracle is also donating a code and resources.

Even though I already posted, and will post more, information on Oracle VM from a technical point of view I love to share the below link with you which you can share with people who are getting into virtualization for the first time.

Flash demo of Oracle VM.

Subversion TCP4 and TCP6

I recently received the request to setup a new source repository for an international team located in India and Europe who will share code during development cycles. The main development will be done on Oracle PL/SQL code and due to the fact that TOAD has support to connect to Subversion and Subversion is know to most developers the decision was made to setup a subversion machine.

Even though I installed and used subversion systems before I now encountered something new. After installing subversion and starting svnserve I was unable to connect. checking if the daemon was running and checking the config it turned out all to be correctly running. Finnaly it leaded us to the networking part of the server. And even then it took me a second look before spotting the issue.

running a netstat -l grep svn command gave me the following line:
tcp6 0 0 [::]:svn [::]:* LISTEN

The second time I looked at the result it turned out that the subversion server was listing under the IPv6 protocol instead of the exepected IPv4.

When yous start svnserve you start it normally with svnserve -d to get it running in a deamon mode. It turns out that, at least under debian, it will pick the IPv6 protocol instead of the IPv4. you can solve this starting the deamon with the following command instead:
svnserve -d --listen-host=0.0.0.0

If you check your netstat info after that you will see the following:
tcp 0 0 *:svn *:* LISTEN

Now it was running on IPv4 and all my network routing was working and I was not blocked somewhere along the route.

Friday, July 16, 2010

Ubuntu install Oracle MOD_OWA


Recently I tried to install MOD_OWA on a Ubuntu Linux machine running a Oracle 11G database. MOD_OWA if the opensource alternative for Oracle mod PL/SQL and is providing a bridge between your Apache webserver and your oracle database. In your database you can develop code to generate HTML documents which are send via your webserver to the client requesting it.


The original intention was to install mod PL/SQL however due to the fact this is more demanding on your machine resources and I only needed it on my laptop to do some coding during commuting between home, work and customers I decided to install MOD_OWA instead as it is covering most of the things I need and the code developed on MOD_OWA is portable for most parts to a MOD PL/SQL installation.


Oracle is running a great guide on the oss.oracle.com website on how to install and use MOD_OWA on a linux installation. After my first failed attempt to install it I followed the guide from Doug McMahon step by step. Even after this I still received a ORA-01804 error when I tried to request any page via MOD_OWA. After consulting with Doug we came to the conclusion that it most likely had something to do with the settings of a $ORACLE_HOME variable.


Checking the $ORACLE_HOME variable for the user running Oracle and the user running Apache resulted in a conclusion that it was set correctly for those users. However, as it turns out Apache is ahving some issues with system variables set for the user running Apache and passing those variables to the child processes. One can see the error clearly when you do a strace (strace - trace system calls and signals) on the Apache processes and request the page that is giving you the error.


//-----------------------------------------------------------------------------------------------------------------
7910 lstat64("/var/tmp/oradiag_jolouwer/diag/clients/user_jolouwer/host_428099999_76/alert/log.xml", {st_mode=S_IFREG0640, st_size=3744, ...}) = 0
7910 stat64("/var/tmp/oradiag_jolouwer/diag/clients/user_jolouwer/host_428099999_76/alert/log.xml", {st_mode=S_IFREG0640, st_size=3744, ...}) = 0
7910 gettimeofday({1273129673, 750457}, NULL) = 0
7910 lstat64("/var/tmp/oradiag_jolouwer/diag/clients/user_jolouwer/host_428099999_76/alert/log.xml", {st_mode=S_IFREG0640, st_size=3744, ...}) = 0
7910 open("/var/tmp/oradiag_jolouwer/diag/clients/user_jolouwer/host_428099999_76/alert/log.xml", O_WRONLYO_CREATO_APPENDO_LARGEFILE, 0660) = 11
7910 write(11, "

In this part of the tracefile you will see on the last line a write statement including a part of a string "Unable to find environment varia". Above 2 files are mentioned. When one checks the log.xml file you will see a entry similar as the one below:


Unable to find environment variable: ORACLE_HOME


This is already telling you that the issue might resides in the $ORACLE_HOME settings even if you already checked this is set correctly for the users running Oracle and Apache. The sqlnet.log file will have a entry as the one below:


Thu May 06 16:43:38 2010

Unable to find environment variable: ORACLE_HOME


It turns out that when you run this combination in Apache you have to make a entry in the file /etc/apache2/envvars . The file wil state in its comments "Since there is no sane way to get the parsed apache2 config in scripts, some settings are defined via environment variables and then used in apache2ctl, /etc/init.d/apache2, /etc/logrotate.d/apache2, etc." So we know some issues might be present when it comes to parsing env variables. So if you add your Oracle env settings in this file and stop/start Apache you will notice that the problem is resolved.

I added the following:
export ORACLE_HOME=/u01/app/jolouwer/product/11.2.0/dbhome_1

export ORACLE_BASE=/u01/app/jolouwer

export ORACLE_SID=orcl

export ORACLE_UNQNAME=orcl


According to Doug he did not find this issue on any other system than the Ubuntu setup I used with a Oracle 11G Release 2. However, if you ever encounter this error when you setup MOD_OWA on a Linux box you might want to check your /etc/apache2/envvars file and try to add your ORACLE_HOME, ORACLE_BASE, ORACLE_SID and ORACLE_UNQNAME to this file.

Thursday, May 27, 2010

Convert PNG to GD2 for nagios

When working with nagios and working with new icons to show on your status map you might encounter a filetype called GD2. In most cases you will have a file, for example LINUX_SERVER.png and you will also have a file called LINUX_SERVER.gd2 .


The .png files are used to be displayed in your browser wherever they are needed. However the status maps where you can see all your server in on screen on a map is generated. For the generation of this map the nagios code is reading the images needed and for a more direct access to the image source the gd2 files are used. GD2 is coming from the GD Graphics Library.

In some cases you download a icon set which is not containing gd2 files but only png files. In this case you can make use of the pngtogd2 utility. This utility is (for debian) part of the libgd-tools package and can be installed via apt-get.

When using the pngtogd2 utiltiy please make sure you use the uncompressed option and chunck size of 0. Compressed gd2 files will make rendering the status map slower so if you do not really need to use compression than don’t use it.

Tuesday, May 25, 2010

Oracle database oerr

In most cases when a error is happening in Oracle you will get a ora-###### message and some text. However in some cases you will only receive the ORA error message number from Oracle and not the text. Most likely you would like to know the meaning of the error message. For this reason Oracle databases are shipping (for the Linux installations) with a tool named oerr which can be found in $ORACLE_HOME/bin when you for example want to know the meaning of the error ORA-06512 you can execute the command "oerr ora 06512" which will provide you the explaining text for this error message.

In case you run your Oracle database on a windows machine and you would like to have access to this tool, Yong Huang has created a perl script to run on your windows machine which can do the same and can be downloaded from http://orafaq.com/scripts/perl/oerr.txt .

Most likely you will not have to use the option very often however it can be very handy from time to time.

Saturday, May 01, 2010

Oracle SQL prevent unique constrain violated error

When creating a database model in your Oracle database (or any other database) you will have to creation relations. When you do things correct (in my opinion) you will base those relations on primary and foreign keys and by using those building unique constraints. Or simply put, binding tables on values. If you want to build a one to many relation you will have to make sure that you hold a column with a unique value, this will be your primary key which can not be null. Making sure that the value in this column is unique is done by the Oracle database, if you try to insert a value which is not unique the database will throw a unique constrain violated error. So you will need to provide some mechanism to ensure you only insert unique values.

So, the database will prevent you from inserting a non unique value and will throw a error message, to prevent your code from entering a couple of options possible. For example one can query the highest value + 1. The downside from this is that you need to query the table before you can do a insert which results in computation which is not needed and which can be intense on large tables. a better way is to make use of a database sequence which will provide you the next value. When using a sequence you can do the insert in a couple of ways.

You can get the next value from the sequence like:
SELECT 
sequencename.nextval 
FROM 
dual;

you could use this as a sub-query in your insert statement or get it in your pl/sql code as a variable and use this variable in your insert statement. All options are valid and can be used in your code however an other option is available which I prefer. This option has to be considered the moment you create the table and will make use of a trigger and sequence. The trigger will fire when you insert a record into the table without the unique value. The unique value will be requested by the trigger and inserted into the table.

Before creating the table you will have to define a sequence. In the example below we first create a sequence named johan.WEBLOG_EXAMPLE_0_SEQ

CREATE SEQUENCE "JOHAN"."WEBLOG_EXAMPLE_0_SEQ"
MINVALUE 1 
MAXVALUE 9999999999999999999999999999 
INCREMENT BY 1 
START WITH 1 
CACHE 20 
NOORDER 
NOCYCLE ;
This sequence will provide us a unique number every time we do a request for a nextval like we did in the first example and in the example below where it is done manual:
SELECT 
johan.WEBLOG_EXAMPLE_0_SEQ.nextval 
FROM 
dual;
Now we have created a sequence we will create the table in which we will place a trigger which uses the sequence johan.WEBLOG_EXAMPLE_0_SEQ. We name the table WEBLOG_EXAMPLE_0
CREATE TABLE "JOHAN"."WEBLOG_EXAMPLE_0"
(
"ID_COLUMN"     NUMBER NOT NULL ENABLE,
"DATA_COLUMN_0" VARCHAR2(120 BYTE),
"DATA_COLUMN_1" VARCHAR2(120 BYTE),
CONSTRAINT "WEBLOG_EXAMPLE_0_PK" PRIMARY KEY ("ID_COLUMN") USING INDEX PCTFREE 10 INITRANS 2 MAXTRANS 255 COMPUTE STATISTICS STORAGE(INITIAL 65536 NEXT 1048576 MINEXTENTS 1 MAXEXTENTS 2147483645 PCTINCREASE 0 FREELISTS 1 FREELIST GROUPS 1 BUFFER_POOL DEFAULT FLASH_CACHE DEFAULT CELL_FLASH_CACHE DEFAULT) TABLESPACE "USERS" ENABLE
)
SEGMENT CREATION IMMEDIATE PCTFREE 10 PCTUSED 40 INITRANS 1 MAXTRANS 255 NOCOMPRESS LOGGING STORAGE
(
INITIAL 65536 NEXT 1048576 MINEXTENTS 1 MAXEXTENTS 2147483645 PCTINCREASE 0 FREELISTS 1 FREELIST GROUPS 1 BUFFER_POOL DEFAULT FLASH_CACHE DEFAULT CELL_FLASH_CACHE DEFAULT
)
TABLESPACE "USERS" ;
CREATE OR REPLACE TRIGGER "JOHAN"."WEBLOG_EXAMPLE_0_TRG" BEFORE
INSERT ON JOHAN.WEBLOG_EXAMPLE_0 FOR EACH ROW BEGIN <<COLUMN_SEQUENCES>> BEGIN IF :NEW.ID_COLUMN IS NULL THEN
SELECT WEBLOG_EXAMPLE_0_SEQ.NEXTVAL INTO :NEW.ID_COLUMN FROM DUAL;
END IF;
END COLUMN_SEQUENCES;
END;
/
ALTER TRIGGER "JOHAN"."WEBLOG_EXAMPLE_0_TRG" ENABLE;
In the example above you can see that we create the table and also create a before trigger named WEBLOG_EXAMPLE_0_TRG. This will make sure that before the record is inserted it will be checked if a value for the unique column "ID_COLUMN" is given. If this value is NULL it will request a nextval from the sequence and place this in the "ID_COLUMN". after this is done the record is inserted. This is one the most secure ways of making sure you will try to insert a unique value in your "ID_COLUMN". In the example below we will see this:
INSERT INTO JOHAN.WEBLOG_EXAMPLE_0 
(DATA_COLUMN_0, 
DATA_COLUMN_1) 
VALUES ('blabla', 
'more blabla');
when we do a select on the table we will notice that the trigger is working and that the "ID_COLUMN" column now has a value of 1, the following will get a value of 2 etc etc etc.