Saturday, April 09, 2011

oracle.ideimpl.webupdate.task.TaskFailedException

I recently tried to update my Oracle Jdeveloper installation with some updates coming from Oracle. You can update your Jdeveloper installation by clicking "help" - "Check for Updates". I needed to install some updates including the "AIA composite application framework version 2.4" update. When selecting it a process is started and after that you are requested to restart your Jdeveloper installation. This should complete the process and you should be able to use the new version. However due to some reason the new functionality was not installed. When checking for updates again I also found the "AIA composite application framework version 2.4" update still in the list of updates to be installed.

After some time I found that if I started Jdeveloper from the command line I could see a error messages stating the following: "oracle.ideimpl.webupdate.task.TaskFailedException: Unable to read /Users/suntac/.jdeveloper/tmp/update/oracle.aia.caf.jdevextension.2.4.zip". When jdeveloper downloads updates it is storing it under a tmp/update folder as a .zip file. Upon looking into this location I found that the file was empty.

Thanks to William from the Oracle jDeveloper support team I was able to download the file myself by hand. You can check manually all the updates at the "Oracle Extensions for Oracle JDeveloper Update Center" which is located at http://www.oracle.com/ocom/groups/public/@otn/documents/webcontent/131167.xml . Now when you download the file you can again start the "check for updates" option under the help menu however no pick the option to select from a local file.

At this screen you can select the location of the zip file you just downloaded. You will again be asked to restart jdeveloper and now you will notice that the file is installed without any issue.

Monday, March 28, 2011

Linux, check interface status

In some cases you might want to check the status of your network interfaces from a script. In a "normal" situation you can just run a ifconfig command and look if your interface is up or down however when you want to do this automated from within a script you do not want the complete output of ifconfig. You might just want a simple "up" or a simple "down" string returned. If you for example want to use this within a custom check in Nagios or Oracle Enterprise Manager.

You have some options, in the example below I will provide a "up" or a "down" string based upon the status of the interface. However you might also go for a even more simplistic way by returning a zero or one value. the script is based upon the fact that you will provide a parameter with the interface name, for example eth0 or en0. in case you provide a interface name that is none existing get a error message something like "ifconfig: interface eth0 does not exist". You can use the standard option to suppress this error message by using the default way to suppers stderr message by adding a "2> /dev/null" at the end of your script.


#!/bin/bash

IFCONFIG="/sbin/ifconfig $1"

ISIT=`$IFCONFIG | grep "UP" | wc -l`;

if test $ISIT -gt 0;
then
echo "up";
else
echo "down";
fi


Oracle OEM and User-Defined Metrics

When you are using a Oracle Enterprise Manager Grid Control approach within your Oracle landscape to monitor and maintain your application and database landscape you can make use of all kinds of predefined checks Oracle will provide you. Even do this is already a great library of important checks and alerts it can always (and will) happen that after some time you would like to extend the functionality. For example if you have build some custom applications you might want to have some checks in place to do some very specific checking on things that will only be applicable for your specific application. To enable you to create your own checks Oracle has provided the "User-Defined Metrics" UDM in short.

User-Defined Metrics can be build using SQL or using scripting languages such as bash. For now we will quickly focus on how to build a simple check with SQL. In the example below I will show how you can build a check on the number of invalid objects in your database.

The first thing you need to do is to find a way how you can achieve what you want via a SQL script. In case of the number of invalid objects you can use the query below;
SELECT
COUNT(1)
FROM dba_objects
WHERE status = 'INVALID'

Now we have to define the User-Defined metrics in Oracle Enterprise Manager. To do so navigate to "targets" -> "Databases". Below at the end of the page you will find a link "User-Defined Metrics" which will bring you to the page as show in the screenshot below.

You can see I have already created a couple of them. If you want to create a new User-Defined Metrics you can create one by using the "Create Like" button or the "create" button. We will be using the create button which brings you to the page shown below:

We will have to complete a couple of things, first we have to name the UDM. For now I have named it "TEST-invalid". The query is the same as the query shown above. Now we have to enter a username and password. I have used system for this. This might however not be the most optimal choice from a security point of view and you might run into some issues with the security department. What you might want to consider is creating a specific user for the checks to be executed however that is up to the security standards and compliancy you have to keep in mind in your specific environment.

In below screenshot we have to set some some more things. For example the thresholds. This will determine when to raise a warning or state a critical state. I have set in this example that if the value of the script is between 10 and 50 it will be a warning and if it is above 50 it will become critical. In the real world you do not want a single invalid object however this is to state what you can do with it. I have also set a alert message which will state in case of 15 invalid objects "uhoh 50 objects are wrong".

I have also stated that every 15 minutes the system will have to check. If you push test you will get the value and you will see if it is working. When you press OK the check will be created.

In our case 94 objects are invalid so now we can see it on the database page in Oracle Enterprise manager as you can see below. This is only a warning. You can automatilcy have script started and all kind of things however I will go into that at a later stage in another blogpost.

When you click on the message you will be able to see in more detail the current status and the history. This can be good to keep a close eye on your system and the trends in the system.

Wednesday, March 02, 2011

Solved: Logged in user does not have permission to access this page.

When you work with a new installation of the Oracle Install Base module you may encounter some issues when you try to enter a note. This is also encountered in some of the setup done for the vision installation of Oracle e-Business Suite Release 12. I encountered it during some tests of a R12 vision installation. The issue is that if you click "create" button in the notes page in Oracle Install Base you will get a error page stating "Logged in user does not have permission to access this page". No other explanation is given. Looking at metalink the following cause is given in note 455871.1 "The function JTF_CAL_FUNCTION_SECURITY is not added to Oracle Install Base Menu as a SubMenu.". This note is giving you a solution for release 11.5.10.2 and some hints for release 12.

As it turns out the note is not spot on for release 12. What you need to do to get it working for release 12 is the following:

Step 1:
- login to the system and select the system Administrator responsibility
- Go to "security" -> "responsibilities" -> "Define"
- query the Install Base responsibility which is giving you the issue
- copy the value of the "menu" field

Step 2:
- Within the system administrator responsibility go to "applications" and then "Menu".
- Query the correct menu by searching the "User Menu Name" which you retrieved from step1

Step 3:
Now you have to create a new submenu under the menu.
- Leave the "prompt" value blank
- Enter the value "JTF HTML Calendar-Tasks-Notes Function security menu" in the submenu field.
- Enter the value "JTF HTML Calendar Function Security" in the function field
- Save the new submenu

Step 4:
bounce the Apache server so the webserver cache is cleared.

Now you should be able to login to Oracle e-Business Suite and all should work. The change with the metalink note is the value that needs to be entered in the function field when creating a new submenu. The value stated in the metaling note will throw a error when done in a release 12 instance.

Friday, February 18, 2011

Excel Magic Quadrant

When you are working in the IT business you have come across the magic quadrants from Gartner. Gartner uses this way of visualizing prefects or vendors and giving them a place in the market. Gartner states the following about the magic quadrant: "Gartner's Magic Quadrant research methodology provides a graphical competitive positioning of four types of technology providers in fast-growing markets: Leaders, Visionaries, Niche Players and Challengers. For emerging or mature markets, Gartner's MarketScopes are the best tool to help clients understand how the status of an emerging or mature market aligns with their own state of maturity and future plans."

My personal opinion is that the magic quadrant is great to show the information in a single graph, and combined with the knowledge from Gartner and information from your own company you can make a solid decision as a CxO. However, the magic quadrant way of visualizing can be used for so much more than only they way Gartner is using it. I am currently falling inn love with this way of representing information and I recently started to use it to visualize for example the maturity of systems in combination with the business value they represent. This is working great during meetings as you can show a lot of systems in one graph in a way that is also understandable for none tech people.
The idea came after some talks on how to represent data in a none-tech way and we came up with a gartner magic quadrant way of representing the information. Considering you will most likely have only a limited number of tools on your laptop you will most likely be bound to the options to draw such a image in Microsoft powerpoint or to make a graph in Microsoft excel. I have used Microsoft Excel for this task because I could make a framework which can be used for all future graphs I will need. below I explained how this can be done, please note in the example I will be using Microsoft Excel 2011 (version 14.0.2 build 101115) on a mac. The point that it is on a mac will not be that hard to overcome, only the graphs look a little different however the 2011 part you might want to consider if something is not working as expected.


Step 1.
first step is to get your data in a correct format. if you like to create a framework for future use you might want to reserver some space in your sheet where you can enter the data. On the X axis you please reserver 2 columns for your data. one for the values of (in the example of a Gartner magic quadrant) "completeness of vision" and one for "Ability to execute" On the Y axis you can place the product/vendor names. Before you enter your data you should think about the scale of things, you want to have a pre-defined scale on which you will be plotting 0 till 10 might be a good option however you can pick any scale you like. I have picked 0 till 7 due to some internal metric which is based upon this scale. This way you should en up with a nice formatted place to store your data, something like the example below:

Step 2
Your second step would be to introduce a standard bubble chart. this is standard within excel, the thing you need to take into account is that you will need to do some extra setup when selecting your data. you need to create series for every line of data you created in step 1. If you would create a framework you can do a lookup to the cell for every value of the X and Y axis and the name. You will end up with something like the below example.
Step 3.
A bubble chart is by default using a automatic horizontal and vertical axis scale which you do not want to have in this example. You want to devoid your graph in 4 equal parts where everything below a certain figure is in a certain area of your graph so you have to unset the auto scale function on your axis. Tis can be done with the format axis option of your chart. It is advisable to set the max 1 point higher than the scale you defined in step 1 and the min one point lower. This ensures that a bubble which is on the lowest (or highest) part of your scale will not be shown half because it is falling of your plot area. In the below example you can see the settings for a scale 0 till 7. After you have set you scale you want to remove the axis from the plot area so you will not see it (or need it).
Step 4.
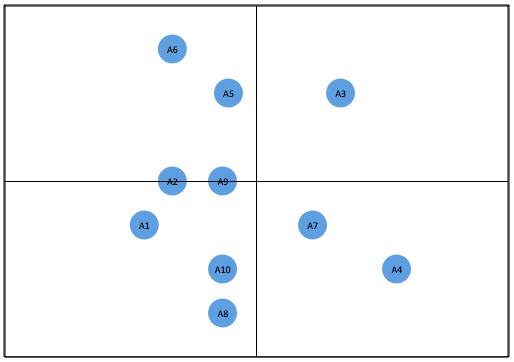
In principle your magic quadrant is now done. All you have to do is some design steps. You should remove the grid lines and draw a box around your plot area. After that you need to draw a cross with vertical and horizontal lines from the middle of your box. Now you can see the magic quadrant coming to what you expect of it. From a design perspective you might want to shrink the size of the bubbles and add labels to it and position them on the left, the right, the center or any other position in respect of the bubble you feel conferrable with. You might want to do all kinds of other design things however the result till now will look something like the below example:


Tuesday, February 08, 2011

solved: there are no valid navigations for this responsibility

Recently I tried to setup some roles for Oracle e-Business Suite (11.5.10.2) by using Oracle User Management. To be able to do so I granted myself the User management responsibility. However, when entering the responsibility I encountered a error stating "there are no valid navigations for this responsibility" as shown in the screenshot below.

As it turns out you need to do some other things when you want to grant yourself this responsibility You have to grant yourself the rights via user management by using the sysadmin account. It looks like a catch 22 however this is in a normal situation something you only need to do when you setup your system the first time and would like to make use of Oracle User Management. In a normal situation (not a test instance) you would provide one user the rights to access this and have this user propagate the rights to other users from within his account.

Looking At Oracle metalink you have to undertake the below steps and indeed, this is the solution for this issue;


1. Log into the applications as SYSADMIN User.

2. Choose User Management responsibility.

3. Navigate to Users web page.

4. Search and find the user you want to inherit the Security Administrator and Customer Administrator Roles.

5. Click on Update Icon.

6. Click on Assign Roles button.

7. Find and choose 'Security Administrator' Role.

8. Apply.

9. Repeat the Steps (6-8) for 'Customer Administrator' Role.

10. Log as the user who was assigned User Management Responsibility and facing the issue.

11. Retest the issue.

12. Migrate the solution as appropriate to other environments.

Monday, January 03, 2011

solve oracle error ORA-01999: password file cannot be updated in SHARED mode

sometimes under specific conditions you want to change the password of the Oracle database user sys. Their is however something special with the password for the sys user which might cause you to run into a ORA-01999 error. reason for this is that your database is using a REMOTE_LOGIN_PASSWORDFILE file and this file is set to SHARED. Shared means that one or more database can share the same password file which is for example used in a RAC setup. In my case it was NOT a RAC setup it was a standalone database. So if you want to change the sys password in that case you have to change the mode from SHARED to EXCLUSIVE.

Accoording to the Oracle documentation you have the following options:

# NONE: Setting this parameter to NONE causes Oracle Database to behave as if the password file does not exist. That is, no privileged connections are allowed over nonsecure connections.

# EXCLUSIVE: (The default) An EXCLUSIVE password file can be used with only one instance of one database. Only an EXCLUSIVE file can be modified. Using an EXCLUSIVE password file enables you to add, modify, and delete users. It also enables you to change the SYS password with the ALTER USER command.

# SHARED: A SHARED password file can be used by multiple databases running on the same server, or multiple instances of a Real Application Clusters (RAC) database. A SHARED password file cannot be modified. This means that you cannot add users to a SHARED password file. Any attempt to do so or to change the password of SYS or other users with the SYSDBA or SYSOPER privileges generates an error. All users needing SYSDBA or SYSOPER system privileges must be added to the password file when REMOTE_LOGIN_PASSWORDFILE is set to EXCLUSIVE. After all users are added, you can change REMOTE_LOGIN_PASSWORDFILE to SHARED, and then share the file.

The below example illustrates the error:

SQL> passw sys
Changing password for sys
New password:
Retype new password:
ERROR:
ORA-01999: password file cannot be updated in SHARED mode

Now we have 2 options to do solve this depending on the fact if your database uses a spfile or a pfile setup.

When using a spfile you can do the following:

SQL> alter system set REMOTE_LOGIN_PASSWORDFILE = 'EXCLUSIVE' scope=spfile;

When using a pfile you will have to vi the content of your pfile.

After the settings are picked-up by the database you can change your sys password.

solve ORA-00845: MEMORY_TARGET not supported on this system

I recently tried to start an "old" Oracle 11G database which was installed on a system I used for some other projects. Due to the other projects some settings to the operating system have changed.

When the database was started during the system boot I found an error on the console stating the following error:

ORA-00845: MEMORY_TARGET not supported on this system

It turned out that my tmpfs filesystem was to small for the original settings of my Oracle database. tmpfs is a common name for a temporary file storage facility on many Unix-like operating systems. It is intended to appear as a mounted file system, but stored in volatile memory instead of a persistent storage device. A similar construction is a RAM disk, which appears as a virtual disk drive and hosts a disk file system.

You can check your tmpfs mount with a simple df -h command like below (this is the state after the change):

[oracle@oem bin]$ df -h
Filesystem Size Used Avail Use% Mounted on
/dev/xvda2 4.1G 3.0G 1.1G 75% /
/dev/xvda1 92M 12M 76M 14% /boot
tmpfs 3.0G 1.2G 1.8G 41% /dev/shm
/dev/xvdb1 27G 13G 13G 49% /u01
[oracle@oem bin]$

It turned out the size was not 3.0G and it turned out that my database settings where set for a 2.0G system. You can check this by executing the following command's"

SQL>
SQL> show parameter MEMORY_MAX_TARGET;

NAME TYPE VALUE
------------------------------------ ----------- ------------------------------
memory_max_target big integer 2G
SQL> show PARAMETER MEMORY_TARGET;

NAME TYPE VALUE
------------------------------------ ----------- ------------------------------
memory_target big integer 2G
SQL>
SQL>

This shows we need at least 2.0G, to be sure I made my tmpfs 3.0G by editing my /etc/fstab file. Originally it looked like the one below:

[oracle@oem bin]$ cat /etc/fstab
LABEL=/ / ext3 defaults 1 1
LABEL=/boot /boot ext3 defaults 1 2
tmpfs /dev/shm tmpfs defaults 0 0
devpts /dev/pts devpts gid=5,mode=620 0 0
sysfs /sys sysfs defaults 0 0
proc /proc proc defaults 0 0
LABEL=SWAP-VM swap swap defaults 0 0
LABEL=oms /u01 ext3 defaults 1 2
[oracle@oem bin]$

You can change it to the example below so you will mount 3.0G:

[oracle@oem bin]$ cat /etc/fstab
LABEL=/ / ext3 defaults 1 1
LABEL=/boot /boot ext3 defaults 1 2
tmpfs /dev/shm tmpfs size=3000m 0 0
devpts /dev/pts devpts gid=5,mode=620 0 0
sysfs /sys sysfs defaults 0 0
proc /proc proc defaults 0 0
LABEL=SWAP-VM swap swap defaults 0 0
LABEL=oms /u01 ext3 defaults 1 2
[oracle@oem bin]$

Saturday, January 01, 2011

Oracle VM import template

When using the Oracle VM server to virtualize operating systems you have the option to download templates from Oracle at this edelivery site; http://edelivery.oracle.com/oraclevm . When you download a template you will have to place in the seed_pool directory which can be used by the Oracle VM Manager to use this template to create new virtual machines based upon this template.

If you place the template in the seed_pool location and you check the virtual machine templates screen of your Oracle VM manager you will not see the new template directly. I have just uploaded the OVM_EM_111 template however it is not visible. You will have to activate it first in your VM manager.

On this screen you can click the import function. This will present you the below screen. Here you will have a couple of options. As we have placed the template in our seed_pool directory we will select the option "select from Server Pool (Discover and register)". This will look into the seed_pool and query for all templates which have not yet been activated in the Oracle VM Manager. Other options are "Download from External Source (HTTP and FTP). This can be used in case you store your templates on a HTTP or FTP server somewhere else in your network. An other option is the P2V import function which will do a Physical to Virtual Migration, aka, making a none virtualized system a virtualized system.

When we select the option "select from Server Pool (Discover and register)" we will have to provide some information about the new template and the pool. First we have to select the server pool in which we have placed the template, in our case this is TestPool. This will present a list of none activated templates in the seed_pool directory of this server pool. So we select i our case the OVM_EM_111 template.

We have to state the operating system, a default username and a password and optional we can add a description. After clicking next you can review the information and confirm the operation.

You will now be able to see the new virtual machine OVM_EM_111 in your overview, first the status will be "Importing", for the seed_pool option this is a very short operation, HTTP/FTP will take some more time and P2V can take quite some time depending on the size of the machine. When imported the status will change to "Pending". This means the import has succeeded however you will have to approve the use of this template. You can see the "Approve" button active on the top of the templates.

When clicking on the approve button you will see the below screen where you can add some details and when clicking on the "Approve" button. This will make your template imported and activated/approved for use in the Oracle VM Manager console.

Final result is that you will now see you template active in the total list of templates which can be used.


Friday, December 31, 2010

Oracle VM invalid compressed data to inflate

Installing a Oracle VM template is a quite easy job, however, you might run into a unexpected error in some cases. My home test setup is that I have my Oracle VM running_pool and my seed_pool on a NFS server running Debian. I downloaded all the files needed for the installation of Oracle VM Template for Enterprise Manager Grid Control x86 (32 bit). If you look at the documentation on the Oracle website you have to simple unzip them, this is what the Oracle guide states:

# cd /OVS/seed_pool
# unzip V22875-01.zip
# unzip V22876-01.zip
# unzip V22879-01.zip
# unzip V22877-01.zip

In most cases this should work, the issue is that the zip files (the first 3 of them) contain files that are larger than 4 GB. the zip (or unzip in this case) algorithm is not very happy with files larger than 4 GB. You might encounter a issue like "error: invalid compressed data to inflate". I was under the impression something was not downloaded correctly so I downloaded it again however it gave me the same error and after checking the MD5 it was clear the files where not corrupted.

After some work on google I found a possible solution around this by using 7zip. however a more fine solution is also available without having to install another decompression tool.

This is also working (and more easy):

gunzip -c V22875-01.zip > OVM_EM_111_1of4.tgz
gunzip -c V22876-01.zip > OVM_EM_111_2of4.tgz
gunzip -c V22879-01.zip > OVM_EM_111_3of4.tgz
gunzip -c V22877-01.zip > OVM_EM_111_4of4.tgz

After this the manual continues and you have to execute the following command:

cat OVM_EM_111_?of4.tgz | tar -xzvf -

Now you will have a directory named OVM_EM_111 with your files in it which can be used to setup a new system from you Oracle VM Management console.

Thursday, December 30, 2010

import outlook pst on your mac

I recently started my 100% switch from a IBM Lenovo laptop from the company to a new macbook air. Using a macbook air (or a Linux distro) in a windows dominated corporate domain can be hard so I will share the upcoming time some tips and hints on how to switch and make your life more easy. When I received my macbook air I also received a Microsoft office 2011 suite which holds Microsoft outlook 2011 for mac.

One of the things I used to do, or not do, is delete e-mail. I do store almost all my send and received mail on my "previous" laptop in a local pst file. A pst file can be used on windows to store mail locally instead of on the mail server. So one of the things needed to do was to move my mail archive from my windows laptop to my macbook. A Personal Storage Table (.pst) is an open proprietary file format used to store copies of messages, calendar events, and other items within Microsoft software such as Microsoft Exchange Client, Windows Messaging, and Microsoft Outlook. The open format is controlled by Microsoft who provide free specifications and free irrevocable technology licensing.

A couple of simple steps to get this done. Uncheck the "Hide On My Computer folder" in your preferences menu;


Go to "File" and select "Import", in the next screen you have to select "Outlook Data file (.pst or .olm)";


On the next screen select that you want to import a .PST file;

After this select your .PST file you want to import and after selecting the file click "Import". This process can take some time depending on the size of the .PST file. After this is done you will be able to locate you local file in your left pane of your outlook.

Sunday, December 12, 2010

Linux find hardware

Ok lets say you get into a office from a customer and you have to familiarize yourself as quick as possible with what kind of systems the customer is running in its datacenter. You can do a lot by looking at the operating system however at some point you also want to know what kind of hardware is located in the datacenter, what hardware are those systems are running on. You can quickly see a lot of stuff like memory, CPU and storage however if you want to dive into more detail of the hardware you will find your friend in the lshw command.

lshw stands for list hardware and enables you to list all the hardware on your system. lshw comes in a commandline version and a graphical version. We will focus on the commandline version.

lshw has a couple of options, the first which we will not discuss is the -X command, this will launch the GUI of lshw which we will not discuss. What are great options when you need to index a lot of systems in a short time are the -xml and the -html command. The -html command will generate a very basic command which you could use to generate per server a hardware information page, if you want to do more than only view it and you want to import it in a database for example you can use the -xml option to generate the same content in a xml way.

The -short and -businfo options are more for when you need a quick glimps into the hardware. This is commonly used when you will be debugging some problem which might be related to hardware.

A example of the output of the lshw -short command on one of my laptops is shown below;


root@JOLO-LINUX:~# lshw -short
H/W path Device Class Description
==========================================================
system 6464B88
/0 bus 6464B88
/0/0 memory 128KiB BIOS
/0/6 processor Intel(R) Core(TM)2 Duo CPU T7100 @ 1.80GHz
/0/6/a memory 64KiB L1 cache
/0/6/c memory 2MiB L2 cache
/0/6/0.1 processor Logical CPU
/0/6/0.2 processor Logical CPU
/0/b memory 64KiB L1 cache
/0/2b memory 2GiB System Memory
/0/2b/0 memory 1GiB SODIMM DDR2 Synchronous 667 MHz (1.5 ns)
/0/2b/1 memory 1GiB SODIMM DDR2 Synchronous 667 MHz (1.5 ns)
/0/1 processor
/0/1/0.1 processor Logical CPU
/0/1/0.2 processor Logical CPU
/0/100 bridge Mobile PM965/GM965/GL960 Memory Controller Hub
/0/100/2 display Mobile GM965/GL960 Integrated Graphics Controller
/0/100/2.1 display Mobile GM965/GL960 Integrated Graphics Controller
/0/100/19 eth0 network 82566MM Gigabit Network Connection
/0/100/1a bus 82801H (ICH8 Family) USB UHCI Controller #4
/0/100/1a.1 bus 82801H (ICH8 Family) USB UHCI Controller #5
/0/100/1a.7 bus 82801H (ICH8 Family) USB2 EHCI Controller #2
/0/100/1b multimedia 82801H (ICH8 Family) HD Audio Controller
/0/100/1c bridge 82801H (ICH8 Family) PCI Express Port 1
/0/100/1c.1 bridge 82801H (ICH8 Family) PCI Express Port 2
/0/100/1c.1/0 wlan0 network PRO/Wireless 4965 AG or AGN [Kedron] Network Connection
/0/100/1c.2 bridge 82801H (ICH8 Family) PCI Express Port 3
/0/100/1c.3 bridge 82801H (ICH8 Family) PCI Express Port 4
/0/100/1c.4 bridge 82801H (ICH8 Family) PCI Express Port 5
/0/100/1d bus 82801H (ICH8 Family) USB UHCI Controller #1
/0/100/1d.1 bus 82801H (ICH8 Family) USB UHCI Controller #2
/0/100/1d.2 bus 82801H (ICH8 Family) USB UHCI Controller #3
/0/100/1d.7 bus 82801H (ICH8 Family) USB2 EHCI Controller #1
/0/100/1e bridge 82801 Mobile PCI Bridge
/0/100/1e/0 bridge RL5c476 II
/0/100/1e/0.1 bus R5C832 IEEE 1394 Controller
/0/100/1e/0.2 generic R5C822 SD/SDIO/MMC/MS/MSPro Host Adapter
/0/100/1e/0.3 generic Illegal Vendor ID
/0/100/1e/0.4 generic R5C592 Memory Stick Bus Host Adapter
/0/100/1e/0.5 generic xD-Picture Card Controller
/0/100/1f bridge 82801HBM (ICH8M-E) LPC Interface Controller
/0/100/1f.1 scsi0 storage 82801HBM/HEM (ICH8M/ICH8M-E) IDE Controller
/0/100/1f.1/0.0.0 /dev/cdrom disk DVD/CDRW UJDA775
/0/100/1f.2 scsi2 storage 82801HBM/HEM (ICH8M/ICH8M-E) SATA AHCI Controller
/0/100/1f.2/0.0.0 /dev/sda disk 100GB HITACHI HTS72201
/0/100/1f.2/0.0.0/1 /dev/sda1 volume 35GiB Windows NTFS volume
/0/100/1f.2/0.0.0/2 /dev/sda2 volume 41GiB Windows NTFS volume
/0/100/1f.2/0.0.0/3 /dev/sda3 volume 16GiB Extended partition
/0/100/1f.2/0.0.0/3/5 /dev/sda5 volume 15GiB Linux filesystem partition
/0/100/1f.2/0.0.0/3/6 /dev/sda6 volume 760MiB Linux swap / Solaris partition
/0/100/1f.3 bus 82801H (ICH8 Family) SMBus Controller
/1 power 92P1141
root@JOLO-LINUX:~#


the output of the lshw -businfo command on the same machine is shown below;


root@JOLO-LINUX:~# lshw -businfo
Bus info Device Class Description
=====================================================
system 6464B88
bus 6464B88
memory 128KiB BIOS
cpu@0 processor Intel(R) Core(TM)2 Duo CPU T7100 @ 1.80GHz
memory 64KiB L1 cache
memory 2MiB L2 cache
processor Logical CPU
memory 64KiB L1 cache
memory 2GiB System Memory
memory 1GiB SODIMM DDR2 Synchronous 667 MHz (1.5 ns)
cpu@1 processor
processor Logical CPU
pci@0000:00:00.0 bridge Mobile PM965/GM965/GL960 Memory Controller Hub
pci@0000:00:02.0 display Mobile GM965/GL960 Integrated Graphics Controller
pci@0000:00:02.1 display Mobile GM965/GL960 Integrated Graphics Controller
pci@0000:00:19.0 eth0 network 82566MM Gigabit Network Connection
pci@0000:00:1a.0 bus 82801H (ICH8 Family) USB UHCI Controller #4
pci@0000:00:1a.1 bus 82801H (ICH8 Family) USB UHCI Controller #5
pci@0000:00:1a.7 bus 82801H (ICH8 Family) USB2 EHCI Controller #2
pci@0000:00:1b.0 multimedia 82801H (ICH8 Family) HD Audio Controller
pci@0000:00:1c.0 bridge 82801H (ICH8 Family) PCI Express Port 1
pci@0000:00:1c.1 bridge 82801H (ICH8 Family) PCI Express Port 2
pci@0000:03:00.0 wlan0 network PRO/Wireless 4965 AG or AGN [Kedron] Network Connection
pci@0000:00:1c.2 bridge 82801H (ICH8 Family) PCI Express Port 3
pci@0000:00:1c.3 bridge 82801H (ICH8 Family) PCI Express Port 4
pci@0000:00:1c.4 bridge 82801H (ICH8 Family) PCI Express Port 5
pci@0000:00:1d.0 bus 82801H (ICH8 Family) USB UHCI Controller #1
pci@0000:00:1d.1 bus 82801H (ICH8 Family) USB UHCI Controller #2
pci@0000:00:1d.2 bus 82801H (ICH8 Family) USB UHCI Controller #3
pci@0000:00:1d.7 bus 82801H (ICH8 Family) USB2 EHCI Controller #1
pci@0000:00:1e.0 bridge 82801 Mobile PCI Bridge
pci@0000:15:00.0 bridge RL5c476 II
pci@0000:15:00.1 bus R5C832 IEEE 1394 Controller
pci@0000:15:00.2 generic R5C822 SD/SDIO/MMC/MS/MSPro Host Adapter
pci@0000:15:00.3 generic Illegal Vendor ID
pci@0000:15:00.4 generic R5C592 Memory Stick Bus Host Adapter
pci@0000:15:00.5 generic xD-Picture Card Controller
pci@0000:00:1f.0 bridge 82801HBM (ICH8M-E) LPC Interface Controller
pci@0000:00:1f.1 scsi0 storage 82801HBM/HEM (ICH8M/ICH8M-E) IDE Controller
scsi@0:0.0.0 /dev/cdrom disk DVD/CDRW UJDA775
pci@0000:00:1f.2 scsi2 storage 82801HBM/HEM (ICH8M/ICH8M-E) SATA AHCI Controller
scsi@2:0.0.0 /dev/sda disk 100GB HITACHI HTS72201
scsi@2:0.0.0,1 /dev/sda1 volume 35GiB Windows NTFS volume
scsi@2:0.0.0,2 /dev/sda2 volume 41GiB Windows NTFS volume
scsi@2:0.0.0,3 /dev/sda3 volume 16GiB Extended partition
/dev/sda5 volume 15GiB Linux filesystem partition
/dev/sda6 volume 760MiB Linux swap / Solaris partition
pci@0000:00:1f.3 bus 82801H (ICH8 Family) SMBus Controller
power 92P1141
root@JOLO-LINUX:~#


you can use the lshw command itself without any extra option, this will show you a lot of information however that can be a little intimidating the first time you have a look at it. Better is to limit the output by using a class option. for example using the class option processor. Shown below is the output of the command lshw -class processor ;


root@JOLO-LINUX:~# lshw -class processor
*-cpu:0
description: CPU
product: Intel(R) Core(TM)2 Duo CPU T7100 @ 1.80GHz
vendor: Intel Corp.
physical id: 6
bus info: cpu@0
version: 6.15.13
serial: 0000-06FD-0000-0000-0000-0000
slot: None
size: 1801MHz
capacity: 1801MHz
width: 64 bits
clock: 200MHz
capabilities: boot fpu fpu_exception wp vme de pse tsc msr pae mce cx8 apic mtrr pge mca cmov pat pse36 clflush dts acpi mmx fxsr sse sse2 ss ht tm pbe nx x86-64 constant_tsc arch_perfmon pebs bts aperfmperf pni dtes64 monitor ds_cpl vmx est tm2 ssse3 cx16 xtpr pdcm lahf_lm ida tpr_shadow vnmi flexpriority cpufreq
configuration: id=0
*-logicalcpu:0
description: Logical CPU
physical id: 0.1
width: 64 bits
capabilities: logical
*-logicalcpu:1
description: Logical CPU
physical id: 0.2
width: 64 bits
capabilities: logical
*-cpu:1
physical id: 1
bus info: cpu@1
version: 6.15.13
serial: 0000-06FD-0000-0000-0000-0000
size: 800MHz
capacity: 800MHz
capabilities: vmx ht cpufreq
configuration: id=0
*-logicalcpu:0
description: Logical CPU
physical id: 0.1
capabilities: logical
*-logicalcpu:1
description: Logical CPU
physical id: 0.2
capabilities: logical
root@JOLO-LINUX:~#


the class option can be used also on the other commands, below example is the -class option used on the -short option;


root@JOLO-LINUX:~# lshw -short -class processor
H/W path Device Class Description
==========================================================
/0/6 processor Intel(R) Core(TM)2 Duo CPU T7100 @ 1.80GHz
/0/6/0.1 processor Logical CPU
/0/6/0.2 processor Logical CPU
/0/1 processor
/0/1/0.1 processor Logical CPU
/0/1/0.2 processor Logical CPU
root@JOLO-LINUX:~#


shown below is the class option used on the -businfo option.


root@JOLO-LINUX:~# lshw -businfo -class processor
Bus info Device Class Description
=====================================================
cpu@0 processor Intel(R) Core(TM)2 Duo CPU T7100 @ 1.80GHz
processor Logical CPU
cpu@1 processor
processor Logical CPU
root@JOLO-LINUX:~#


Sunday, December 05, 2010

oracle VM console

When you are using Oracle VM you might sometimes want to jump to the console of one of your virtual machines. You can connect to it using a new SSH session however in some cases it is more easy to connect directly to the console. For this you can use the console option from the XM command.

To be able to use it you first need to know which domain id the virtual machine has you want to connect to. You can use a xm list command for this, the example below is the output of one of my test servers;

[root@vms0 ~]# xm list
Name ID Mem VCPUs State Time(s)
34_jlo1 1 1024 1 -b---- 904.3
39_webcenter0 2 2048 2 -b---- 2742.7
Domain-0 0 574 4 r----- 52882.8
[root@vms0 ~]#

if I want to connect to "39_webcenter0" I will have to use ID 2 meaning my command will be "xm console 2". when you enter this command it will possibly looks like nothing is happening. However if you press enter you will get the login prompt of your console.

[root@vms0 ~]# xm console 2

Enterprise Linux Enterprise Linux AS release 4 (October Update 5)
Kernel 2.6.9-55.0.12.9.1.ELxenU on an i686

webcenter0 login:

Now you will be able to login to your system. One tricky part is how to exit the console again. When you are done you type the exit command and you will again come to the login prompt of your virtual machine. So you are still in the console. The way to exit the console (using putty) is Cntrl + ] and you will again be at the commandline of your Oracle VM server.

Reset Oracle OC4JADMIN password

When working with Oracle middleware you will have to use the OC4JADMIN account at some point. As it is with all username password combinations it can happen that you forget this password. For example you lost it, can not remember it, you get a system that is installed by someone else and you do not have the password. The options why you do not have this password are endless..... reseting the password can be done however not via a simple command. You will need to undertake some steps. This is not a bad thing because in a normal situation you will have the password, however in cases you do not have it you can take the following steps:

1) Login to a shell account on your server (we do only explain UNIX/Linux installs) and go stop your middleware services with "opmnctl stopall".

2) Go to $ORACLE_HOME/j2ee/home/config and open the file system-jazn-data.xml with vi

3) Locate the XML User structure for oc4jadmin

4) Delete the data between the "credentials" tags and enter here a new password with a "!" in front if it. The exclamation mark is important to indeicat that this is the new password.

5) Go to $ORACLE_HOME/j2ee/oc4jinstance/persistence/ascontrol/ascontrol/securestore and delete all file's. This is the location where the cached password are saved so we have to delete them.

6) start your middelware again with a opmnctl command

You are done and ready to go with the new password.

Wednesday, November 03, 2010

wget files from Oracle edelivery

When you want to install software from Oracle you have the great option you can download all you need from the edelivery website. The issue is that most of the files are quite large and in some cases we are talking about a large amount of very large files.

You can download all the files you need and after you downloaded it transfer it to your target server. However this means that your workstation is busy downloading files while you have your target server sitting idle. If you are in the lucky position that you can create a connection to the internet from your server you can download the files by making use of the wget command. The best option is to run the wget command in the background so you can end your connection and go ahead while your server is downloading the files. We assume that you have a linux server with only a commandline, if you are familiar with the download site from Oracle you know that you have to enter some credentials.

Your information is stored in a cookie on your workstation, so you have to move this cookie information to your server, in our case we have uploaded it to the file cookies.txt in the home of the root user. From the edelivery website we get the URL and we have to modify the URL a bit. In the URL we have some '&' signs which have to be changed to '\&'.

the wget command will become something like the example below:
wget --load-cookies /root/cookies.txt -O V14041-01_1of2.zip -bqc http://edelivery.oracle.com/EPD/Download/process_download/V14041-01_1of2.zip?file_id=25145149&aru=10526712&userid=131832&egroup_aru_number=10545708&email=john.do@oracle.com&country_id=528&patch_file=V14041-01_1of2.zip


--load-cookies /root/cookies.txt will state to load a cookie file from the stated location.

-O V14041-01_1of2.zip states the name the file will have to get when it is downloaded.

-bqc states that it will have to run in the background (b), no wget output (q) and it will resume a download if it gets broken (c).

This will make sure that the download will run in the background and you can work on other things while the download is running.