 The issue with most systems where users have the option to enter data in a free form is that as soon as they enter the information you have the possibility that they make a typo. For a textfield like a description this is from a system point of view not a very big issue, however if you want to base logic on the information entered it can be a very big problem. To prevent this you should design applications and interfaces always in such a way that a user can make as little as possible mistakes. You can for example use dropdown menus where a user can select values instead of entering them by hand. This will reduce the number of possible mistakes.
 In Oracle E-Business suite you have besides the standard fields where users can enter information also a option to add extra fields (on most of the screens, not all). Those fields are referred to as flexfields. You have the option to define a Oracle flexfield as a free text field however you can also make it a dropdown menu or LOV (List Of Values).
Most Oracle consultants are aware of how to create a free text field to be used as a flexfield. The option of creating a flexfield as a LOV is however somewhat less commonly know. Please find below an example of how to create a DFF (Dynamic FlexField) with a LOV (List Of Values). We used in this example a request to add a LOV as a Flexfield to a order line in order management.
Step 1:
Identify where you want to create a flexfield. In our case this is in Oracle Order Management at order line level. Just query any random order in the screen and get the record history information of the line via “Help” > “Record History”. You will get a screen like the one below:
Identify where you want to create a flexfield. In our case this is in Oracle Order Management at order line level. Just query any random order in the screen and get the record history information of the line via “Help” > “Record History”. You will get a screen like the one below:

Here you will see that the table name is OE_ORDER_LINES_V. This is however not correct, the _V is indicating that this is not a table, it is a view. And as flexfield information can only be stored in a table we have to find out which table is used. In 99 percent of the cases you can remove the _V and you have your table name or in some cases search for something else than the V In our example the table is OE_ORDER_LINES_ALL.
Step 2:
Select the responsibility “Application Developer” and navigate to “Flexfield” > “Descriptive” > “Register”. Here we will query the descriptive flexfield which is already defined for this table. We can do so by executing a query against the table name which we just learned is OE_ORDER_LINES_ALL.
Select the responsibility “Application Developer” and navigate to “Flexfield” > “Descriptive” > “Register”. Here we will query the descriptive flexfield which is already defined for this table. We can do so by executing a query against the table name which we just learned is OE_ORDER_LINES_ALL.
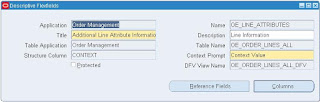 From this screen you can see that the application is indeed “Order Management” and that the title is “Additional Line Attribute Information”. We note this down as we need it in a following step.
 Step 3:
Select the responsibility “Application Developer” and navigate to “Flexfield” > “Descriptive” > “Segments”. Here you can query the needed segment (or create one). In our case we search for Application = “Order Management” and Title = “Additional Line Attribute Information”.
Select the responsibility “Application Developer” and navigate to “Flexfield” > “Descriptive” > “Segments”. Here you can query the needed segment (or create one). In our case we search for Application = “Order Management” and Title = “Additional Line Attribute Information”.
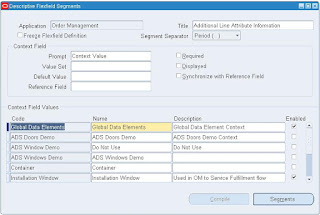
Select a Context Field Value you want your new flexfield to appear in (in our case we use Global Data Elemenst) and click the “Segments”button.
Step 4:
Here you can enter a new line (in our case line 90) with the information you need.
Here you can enter a new line (in our case line 90) with the information you need.
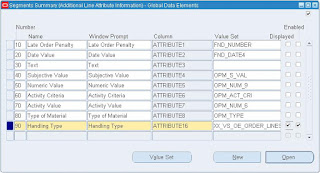
However, before you enter information in the “value set” field click on the “value Set” button. This will open a screen where you can enter the information about the value set that later will hold your preset data for your LOV which will appear in your flexfield.
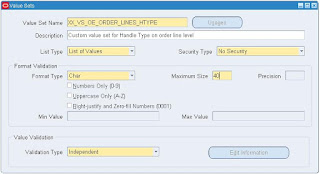
It is smart to pick a name starting with XX_VS where XX stands for custom setup and the VS is representing that it is a value set. After you have set all the information you want you can save it and return to the previous screen where you can enter the new “value set name” into the “value set” field. Save you work and close the screen.
Step 5:
Select the responsibility “Application Developer” and navigate to “Flexfield” > “Descriptive” > “Values”. Query for your new Value Set.
Select the responsibility “Application Developer” and navigate to “Flexfield” > “Descriptive” > “Values”. Query for your new Value Set.
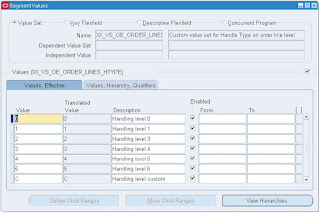
Here you can enter the preset information as you whish. After you are done, save your work.
Step 6:
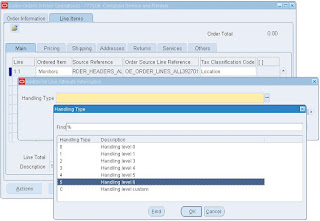
Go to the screen where you intended your flexfield to be a check it. If all is ok you should now have your flexfield as a List Of values in your screen.
Go to the screen where you intended your flexfield to be a check it. If all is ok you should now have your flexfield as a List Of values in your screen.
1 comment:
Thanks so much, it was very helpfull, cheers
Post a Comment